
Get Started with CCIP (EVM)
Get started with Chainlink CCIP 2.0, as a user and as a developer
In this guide, you will:
- Bridge tokens from one chain to another as a user, via Chainlink Transporter.
- Send and receive cross-chain messages as a developer, using Chainlink CCIP 2.0 infrastructure.
Bridge Tokens Using Chainlink Transporter
The Transporter application is a user-friendly tool built by Chainlink Labs to allow users to bridge tokens from one chain to another seamlessly, leveraging the power of CCIP 2.0's infrastructure.
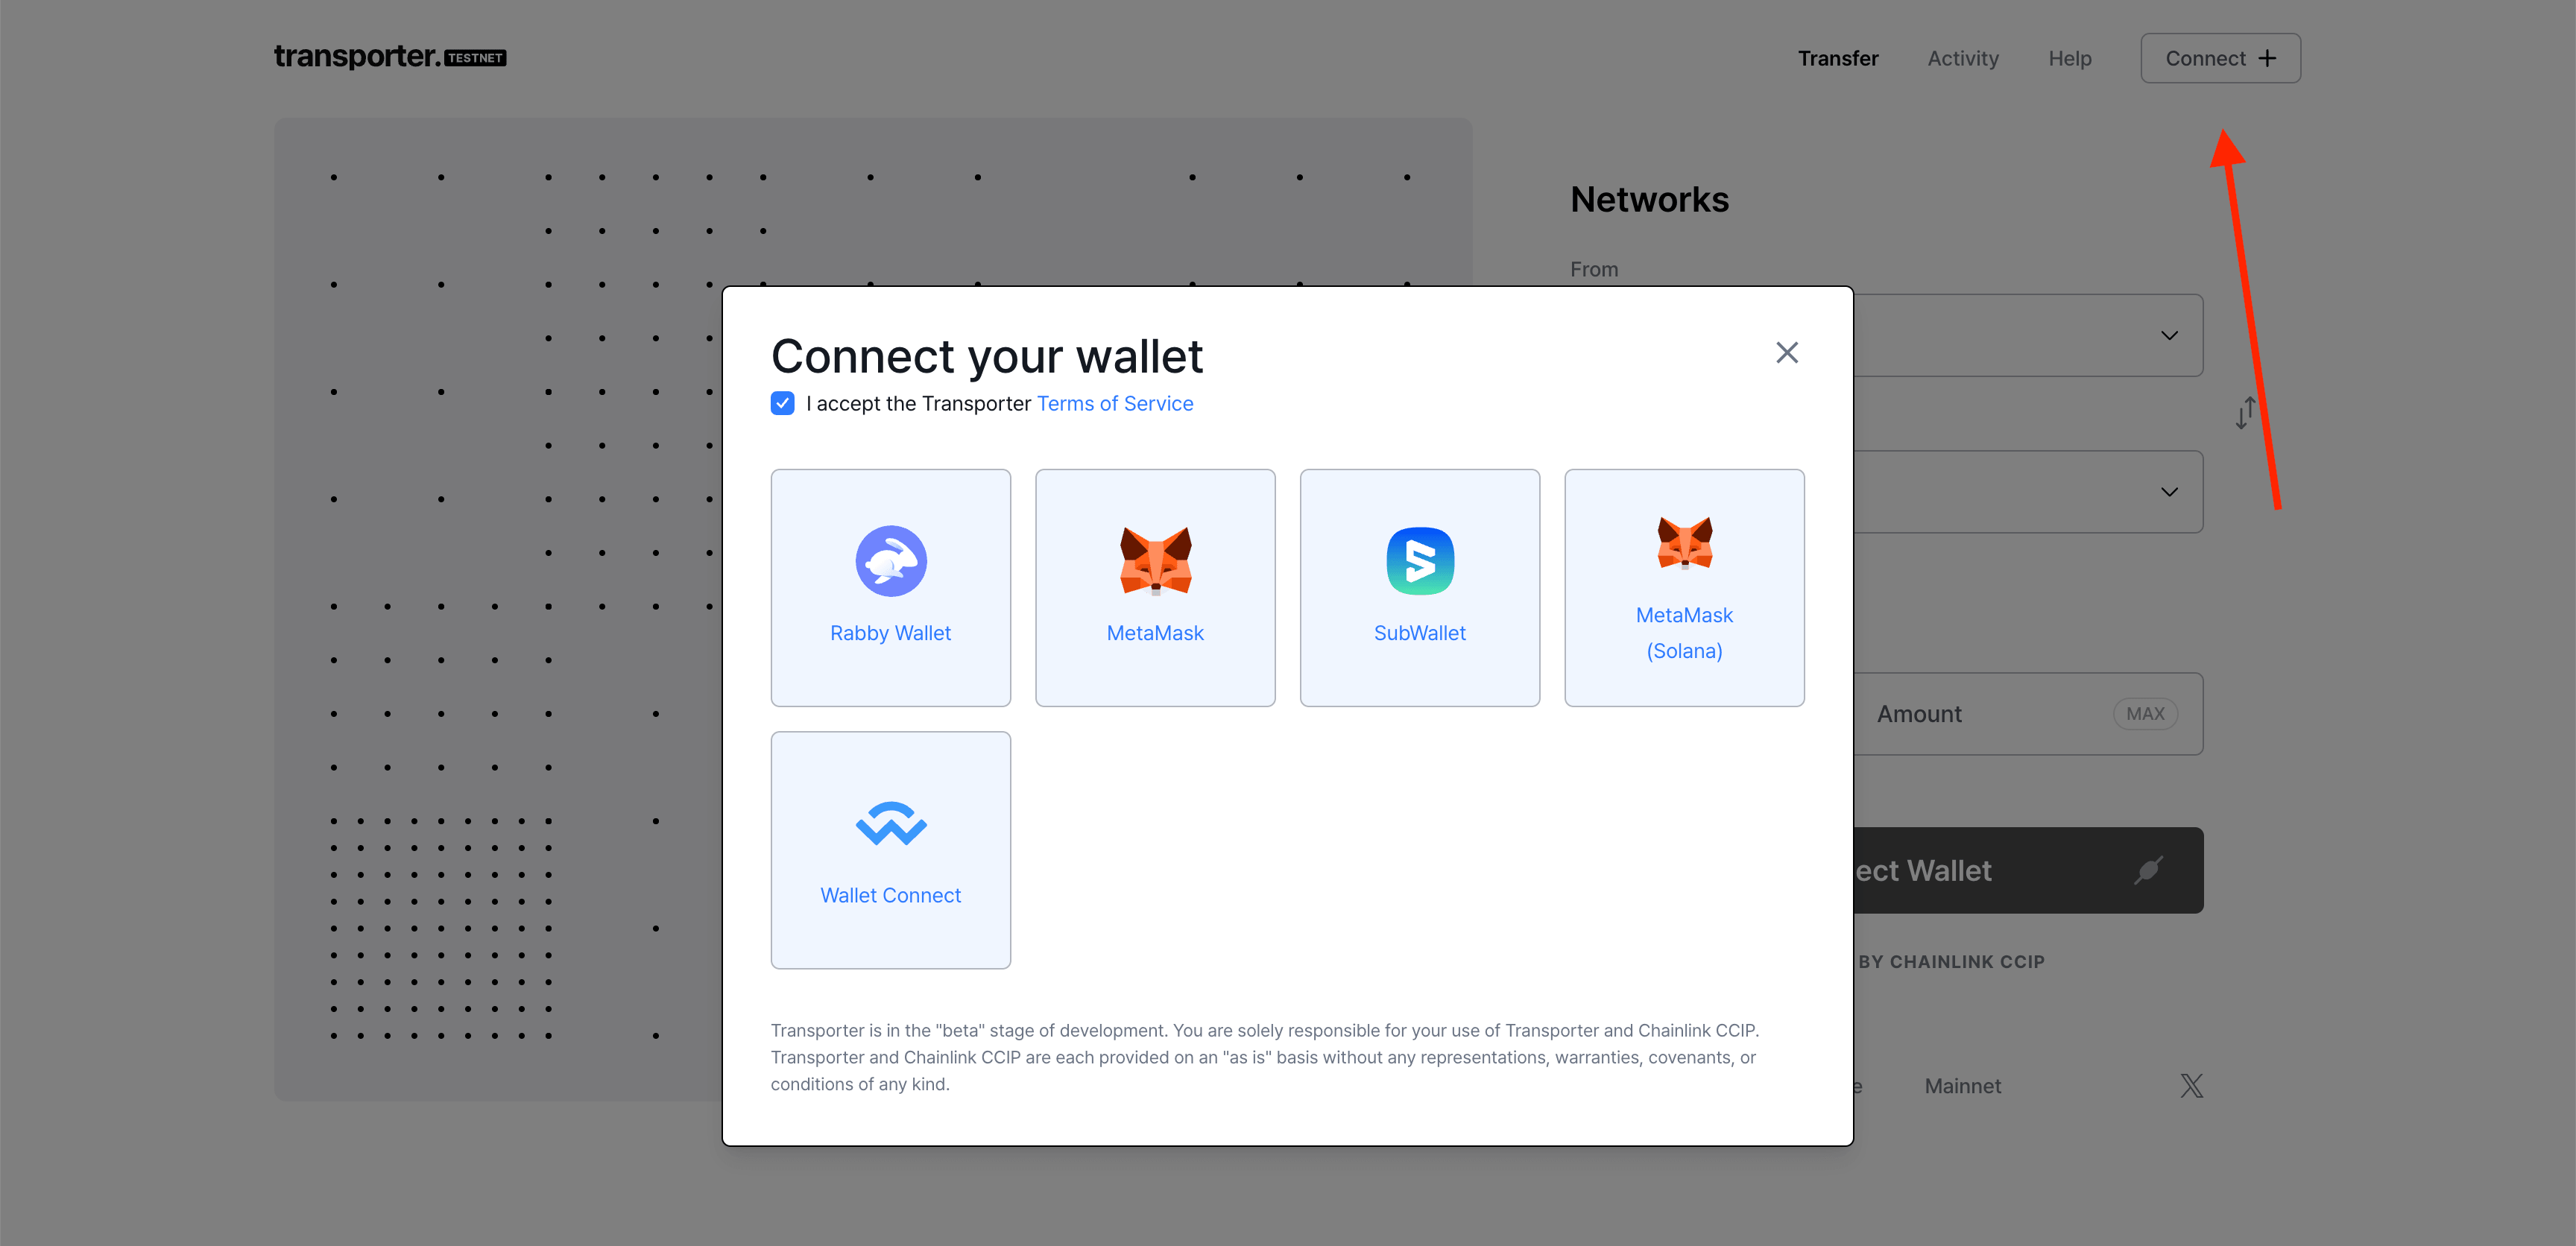
2 Select Lane and Approve Allowance
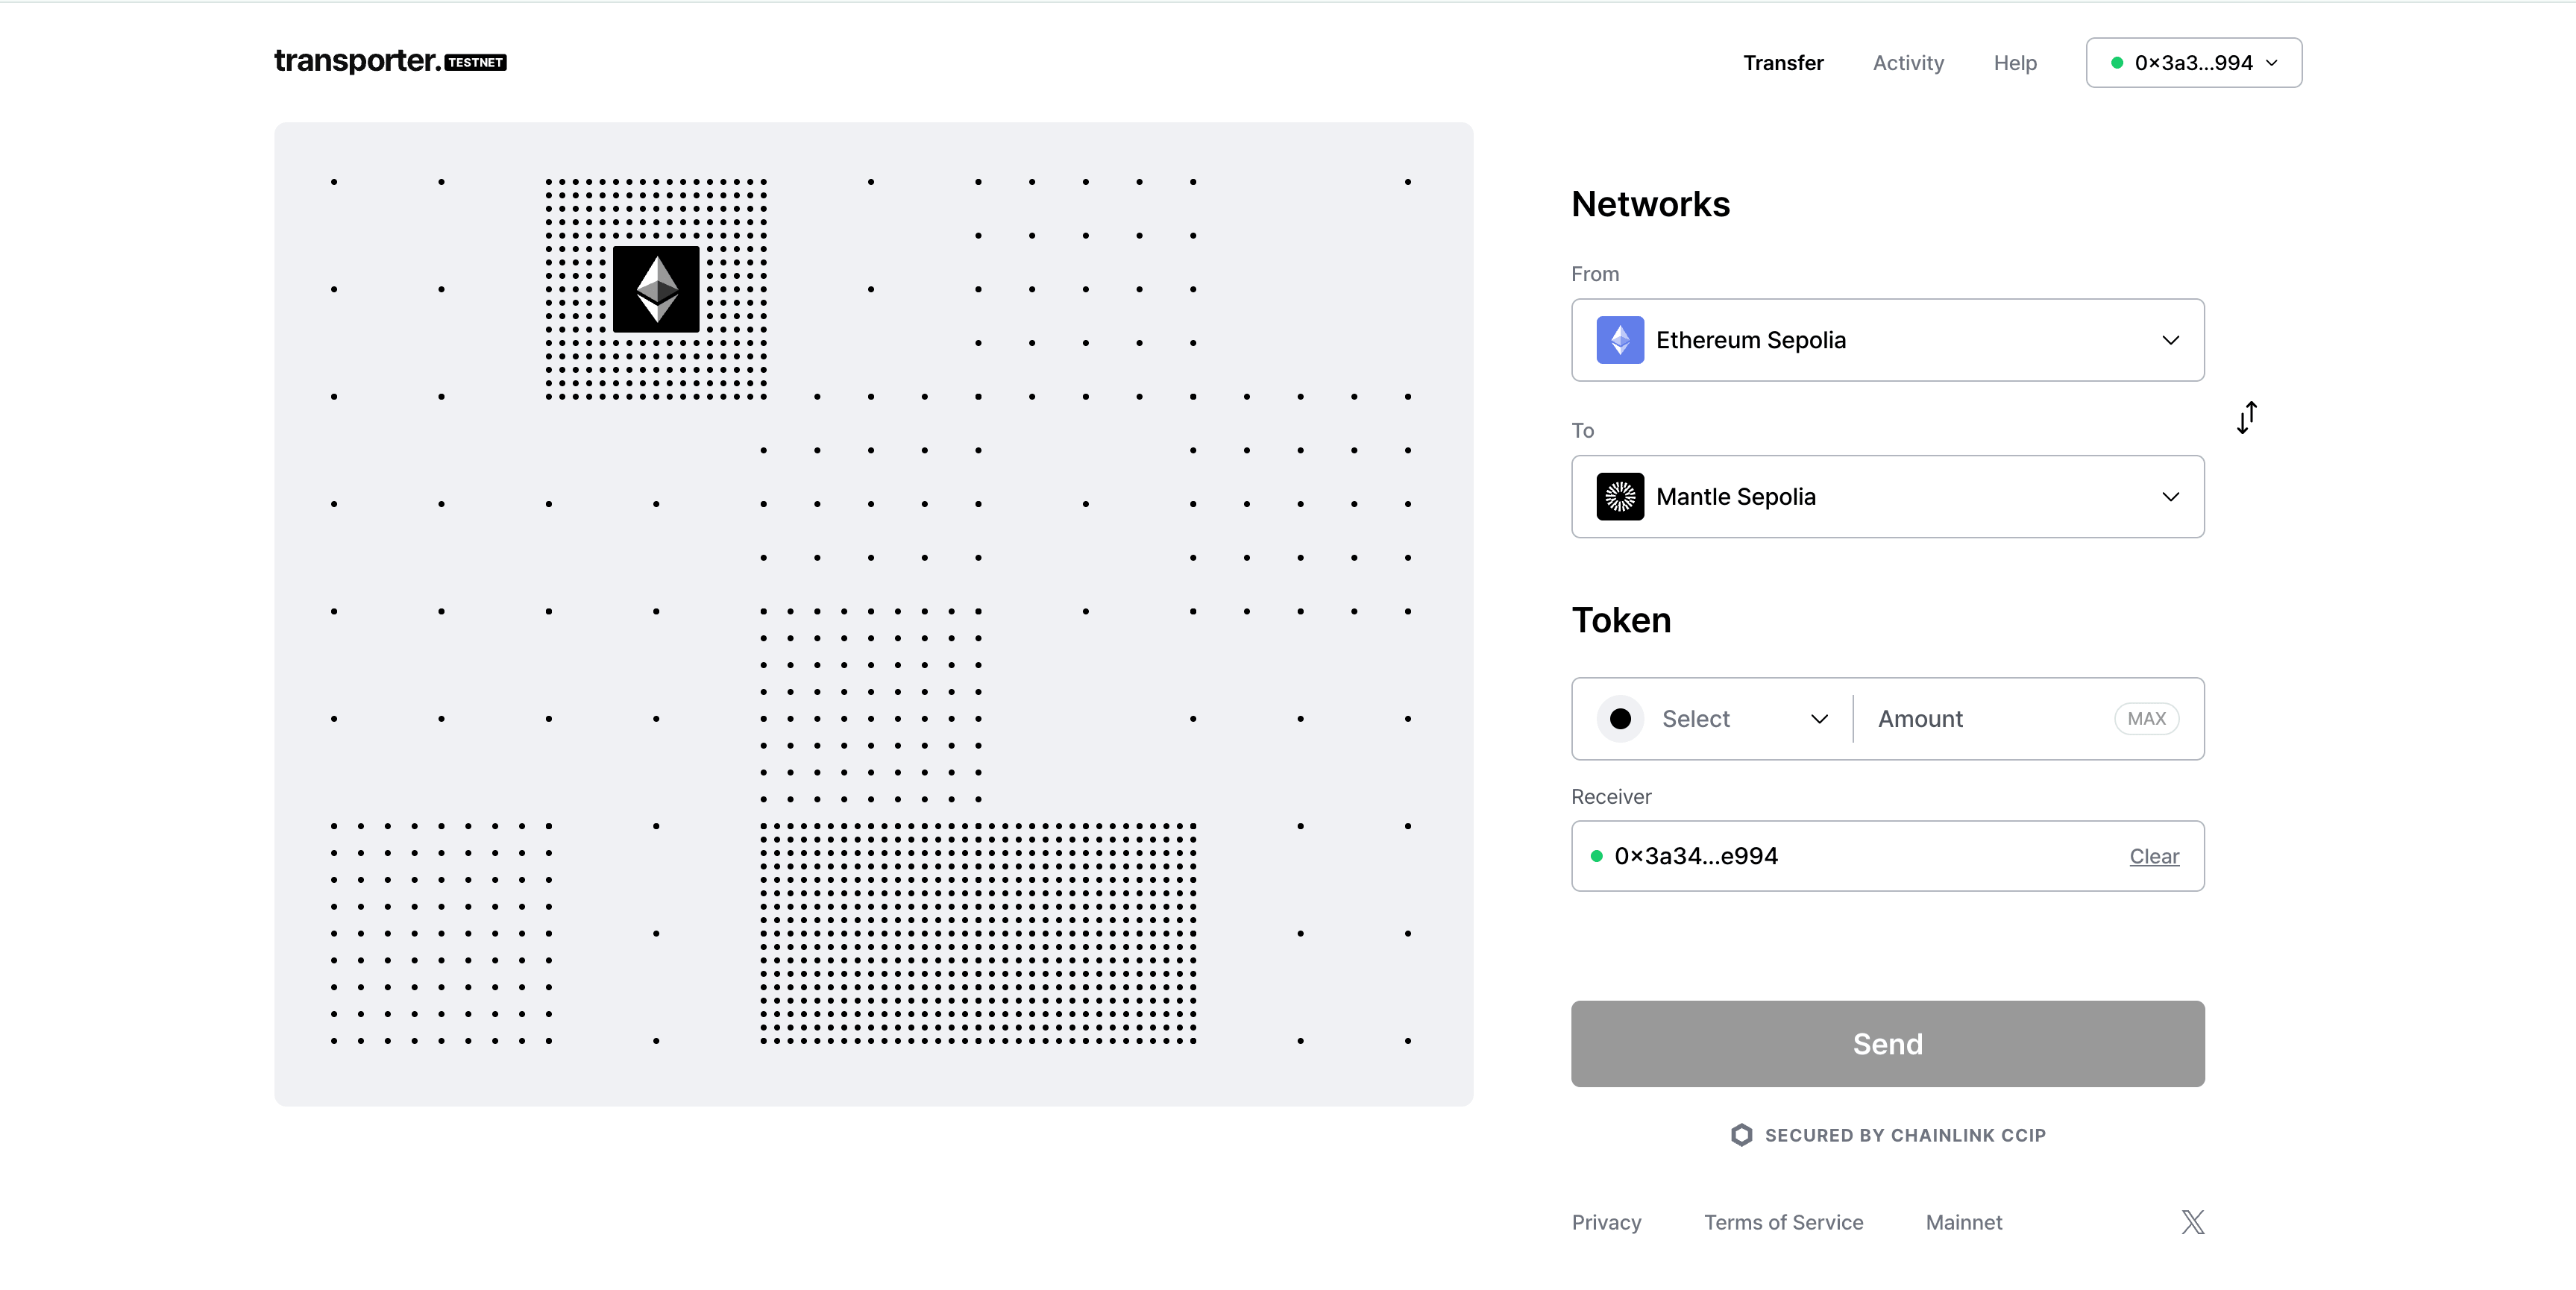
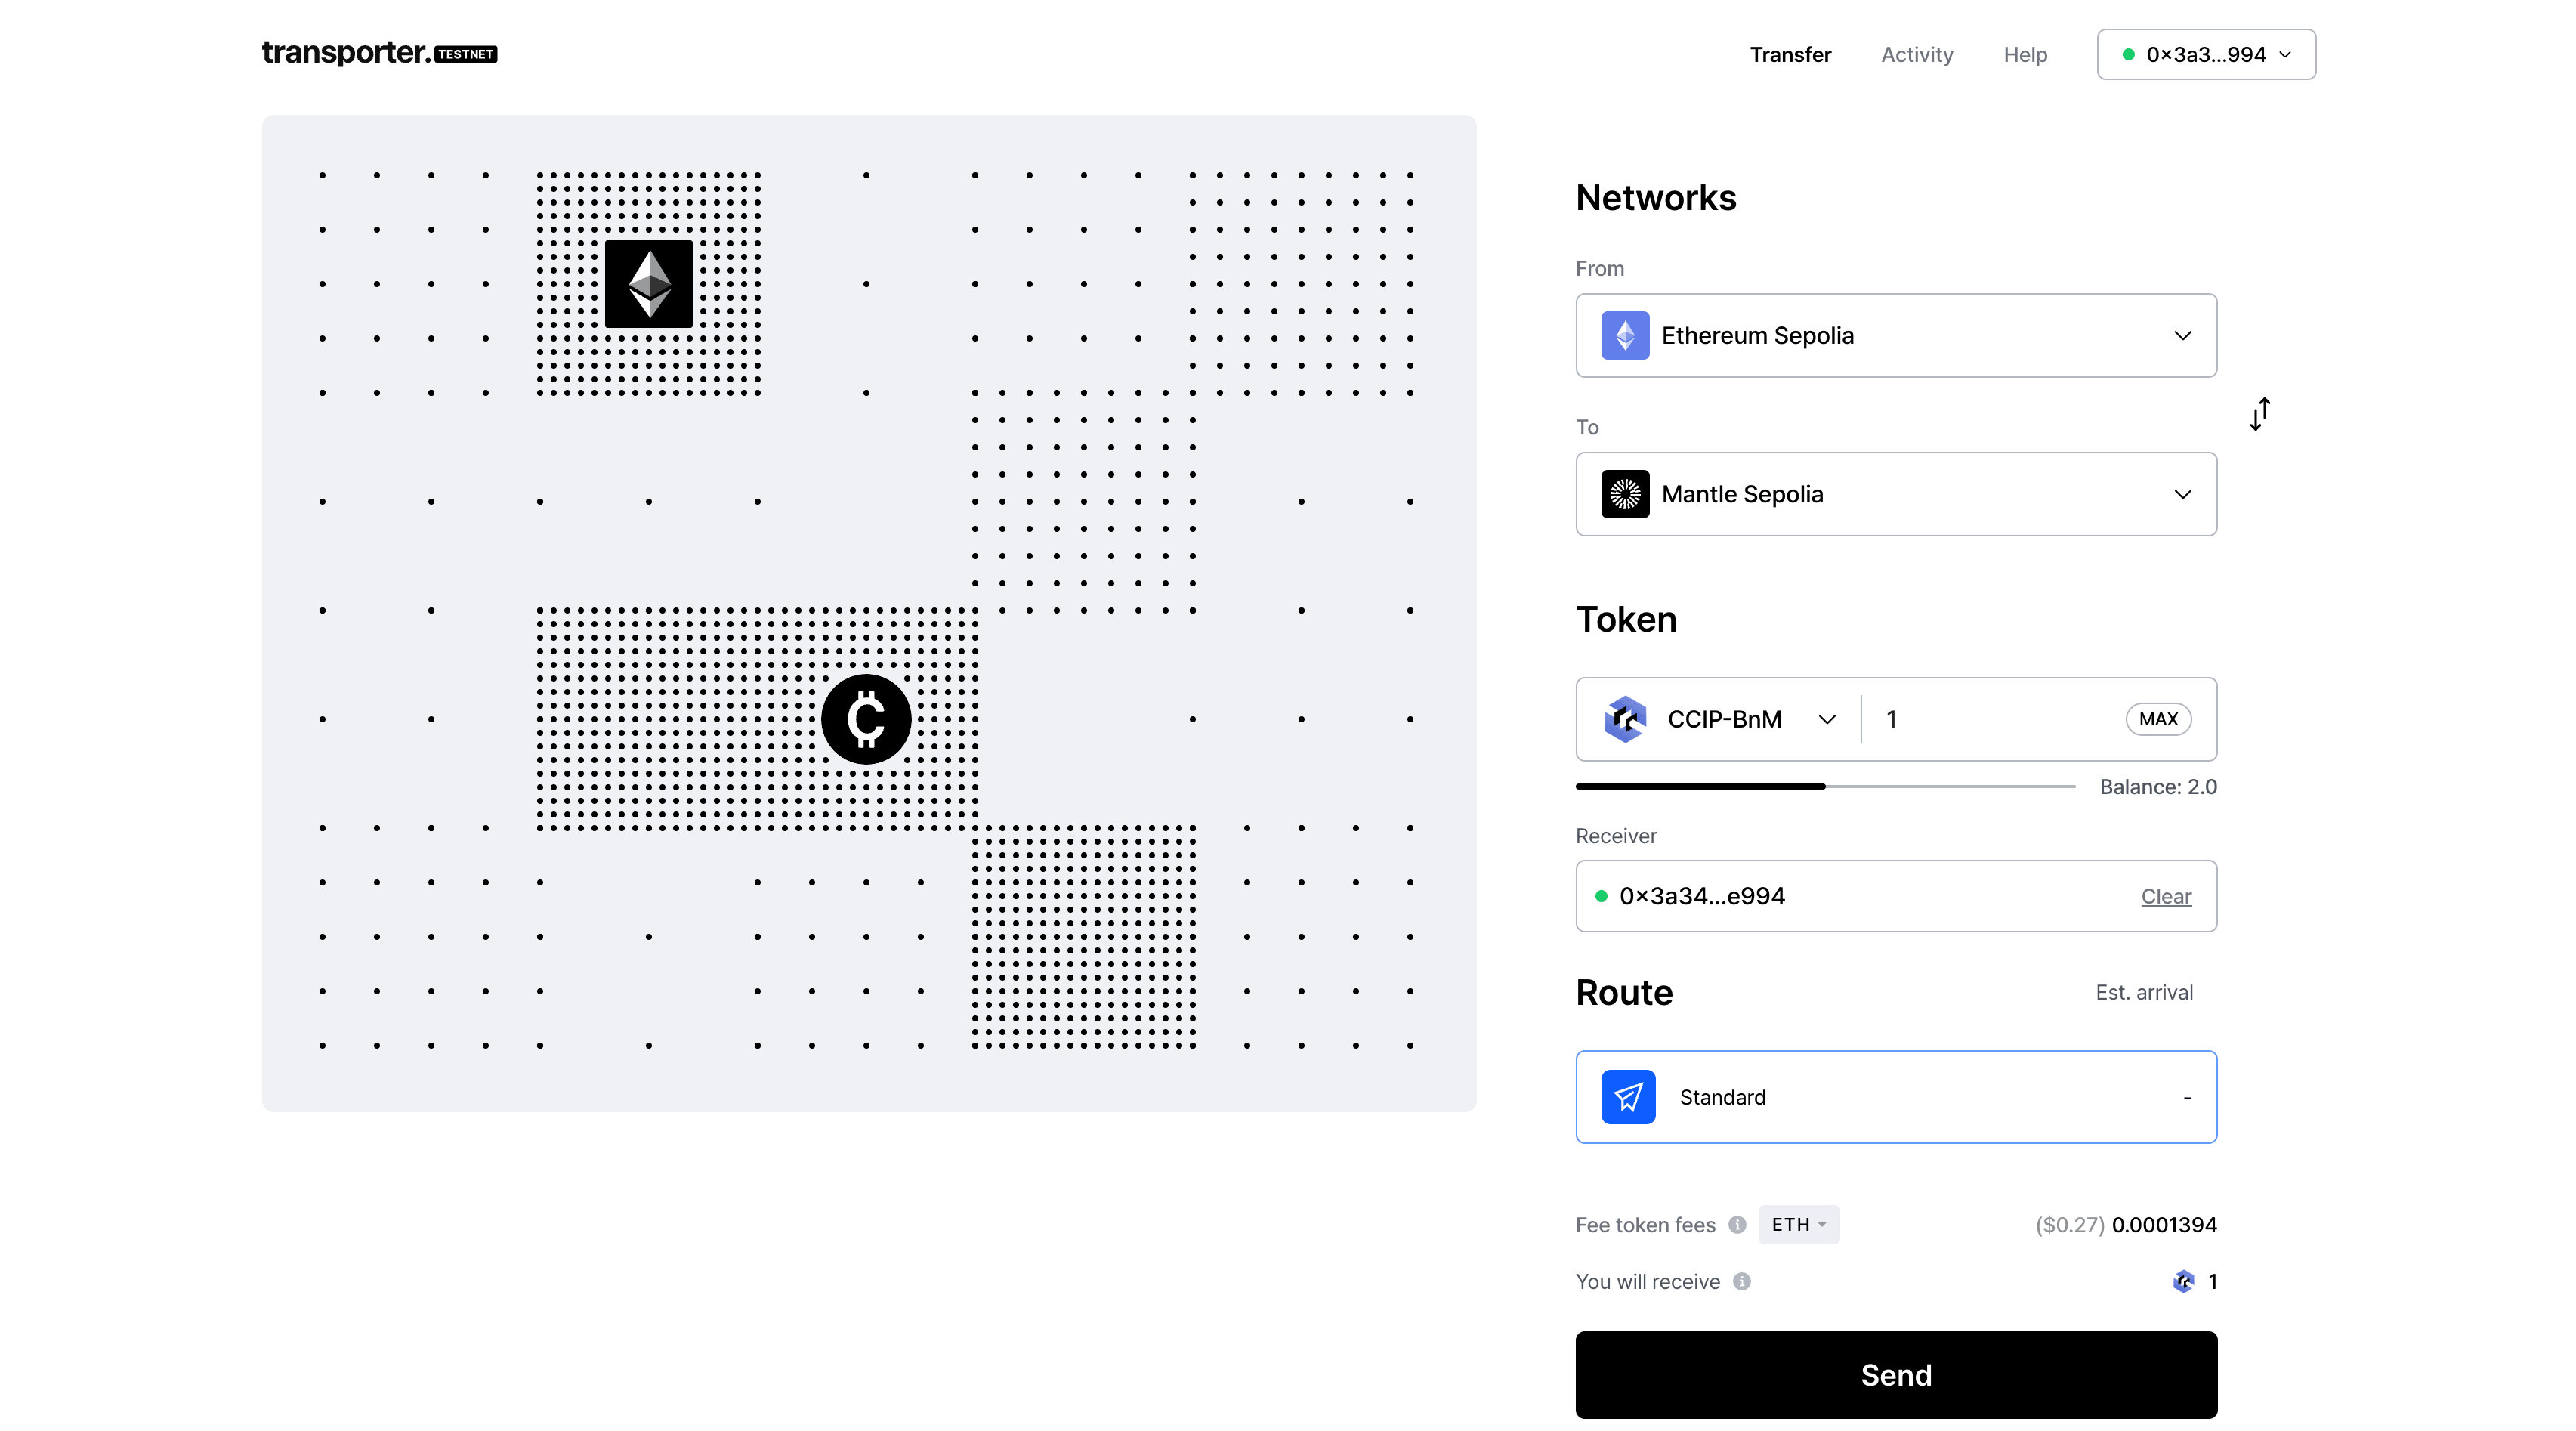
- Select the source and destination chains from the network dropdowns.
- This tutorial uses the testnet version of the Transporter UI, your view may differ depending on the version of the UI you are using, and the types of lanes that are available in the moment.
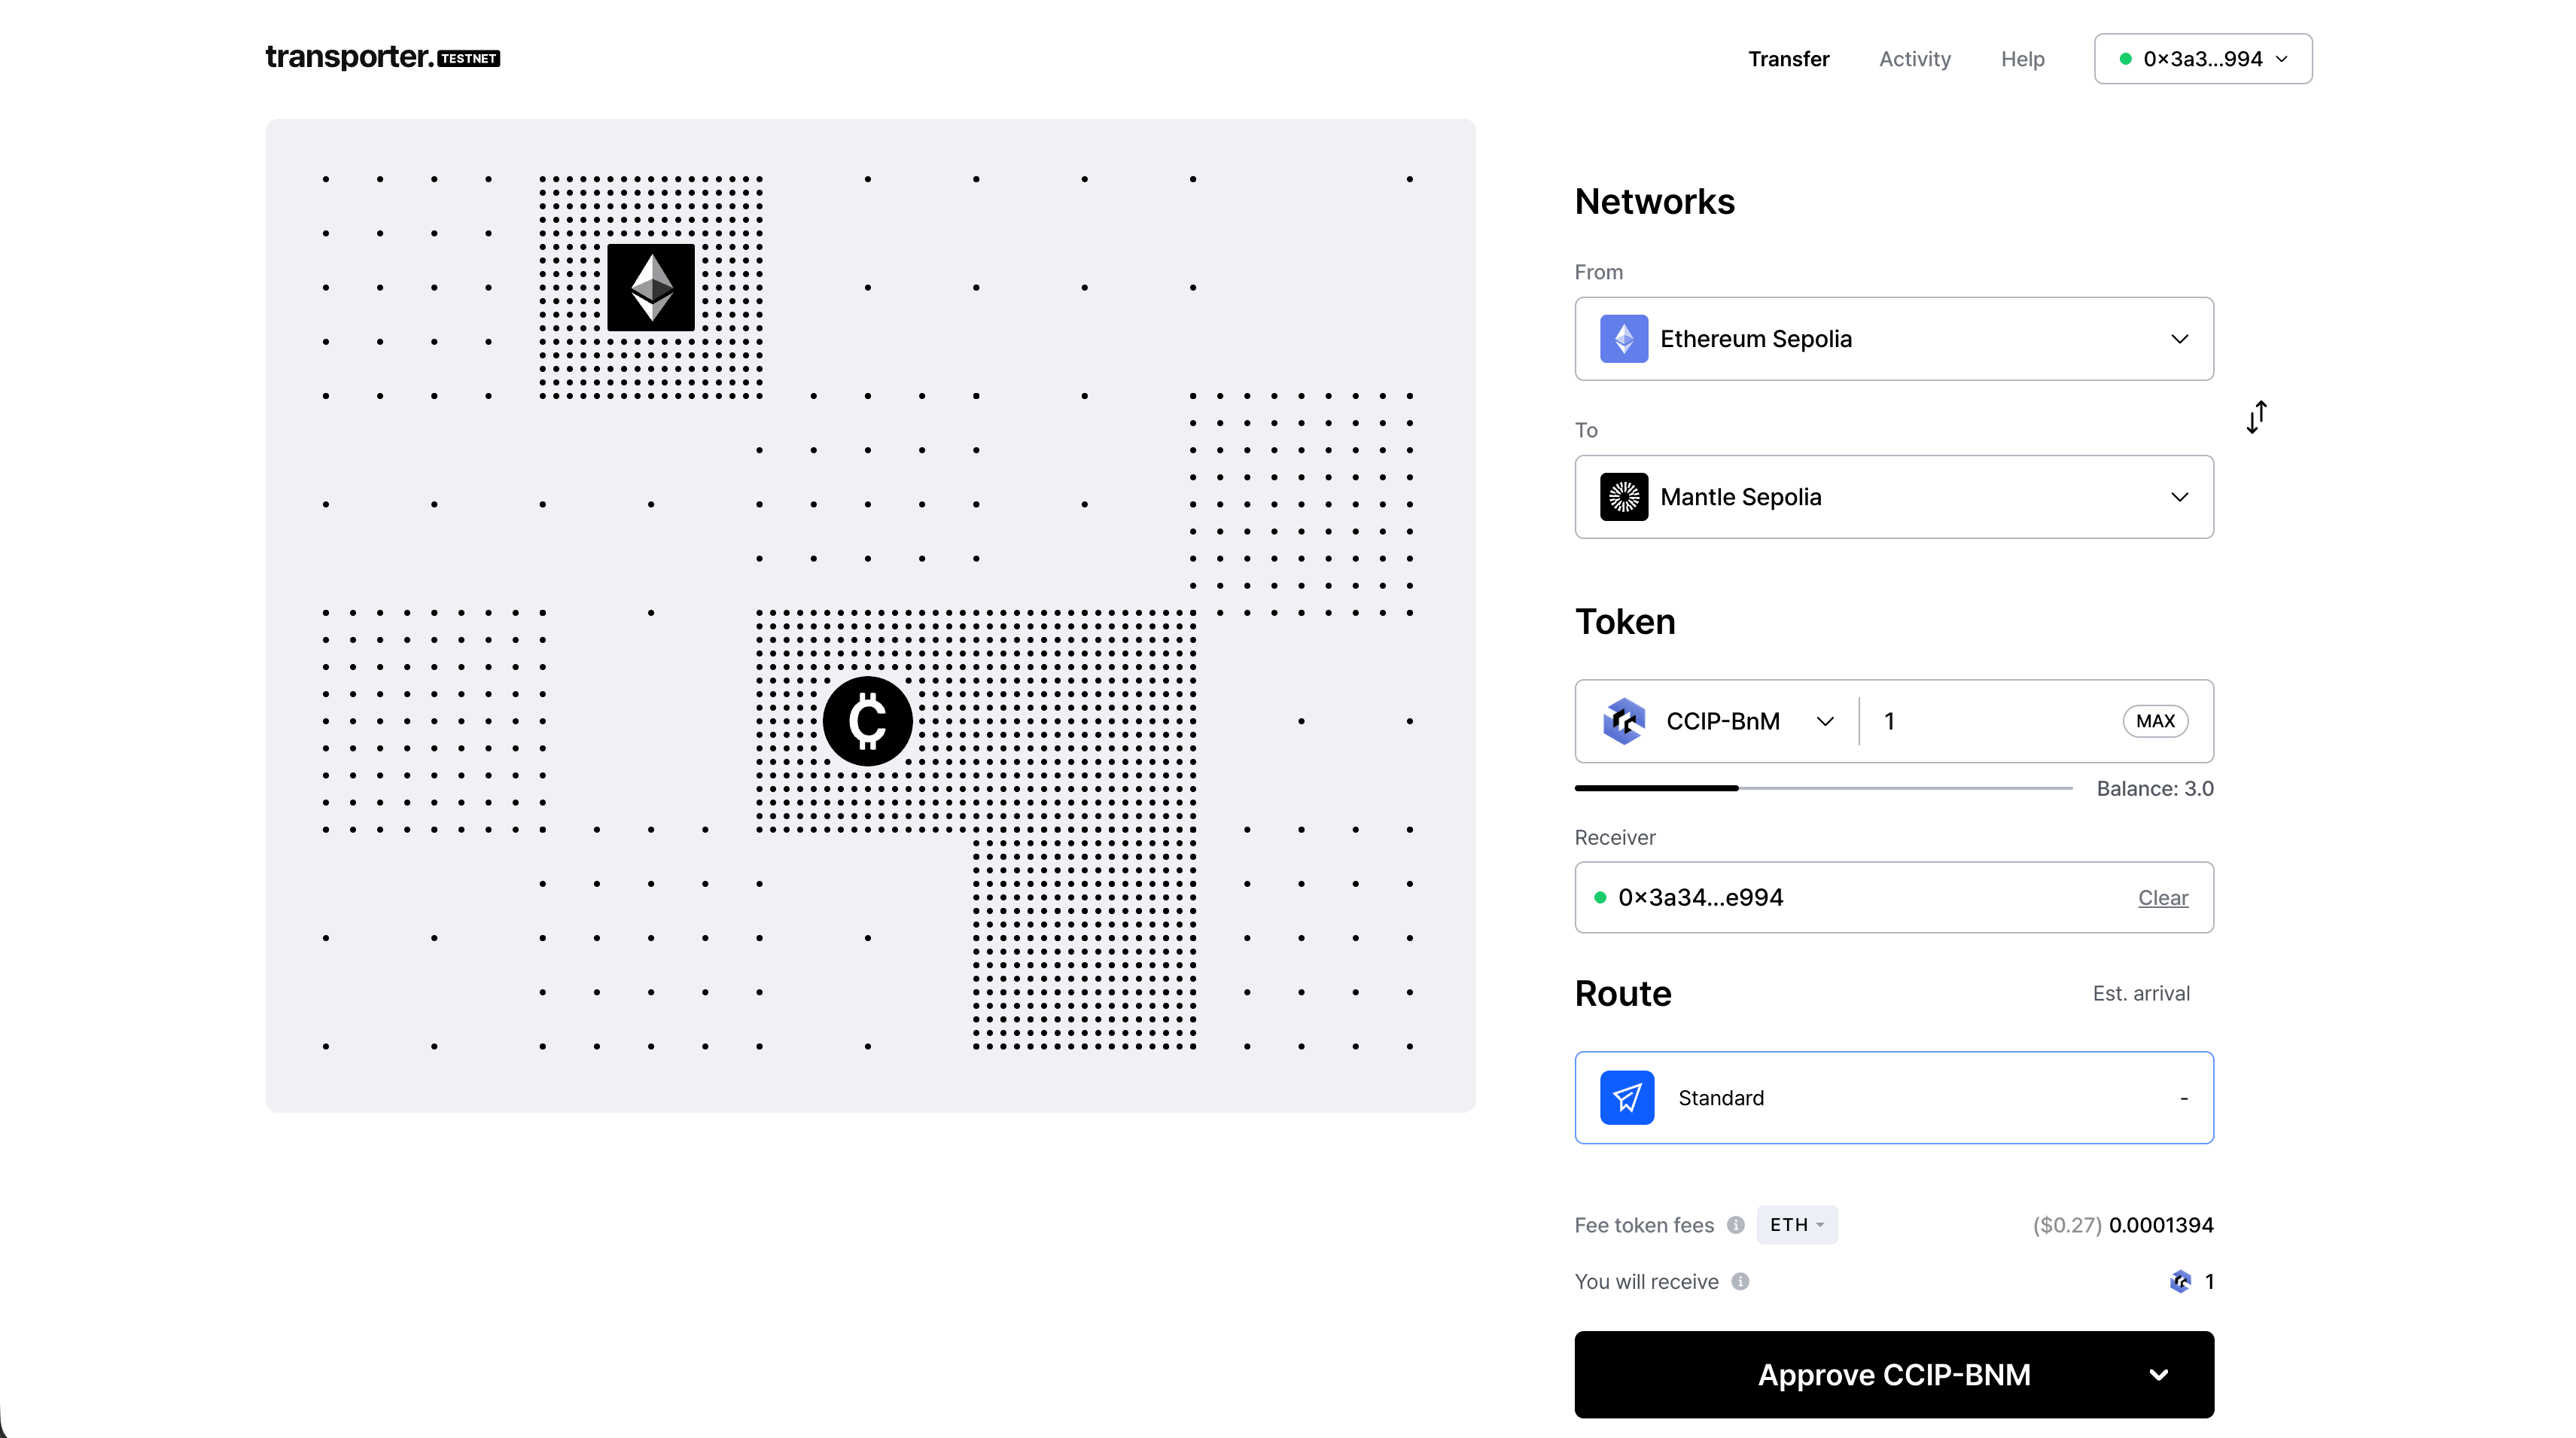
- The UI might ask you to
Approvean allowance on the amount of tokens that you are trying to bridge. We highly recommend users to stick to a one-time allowance and not approve an unlimited allowance, unless the user explicitly intends to do so.
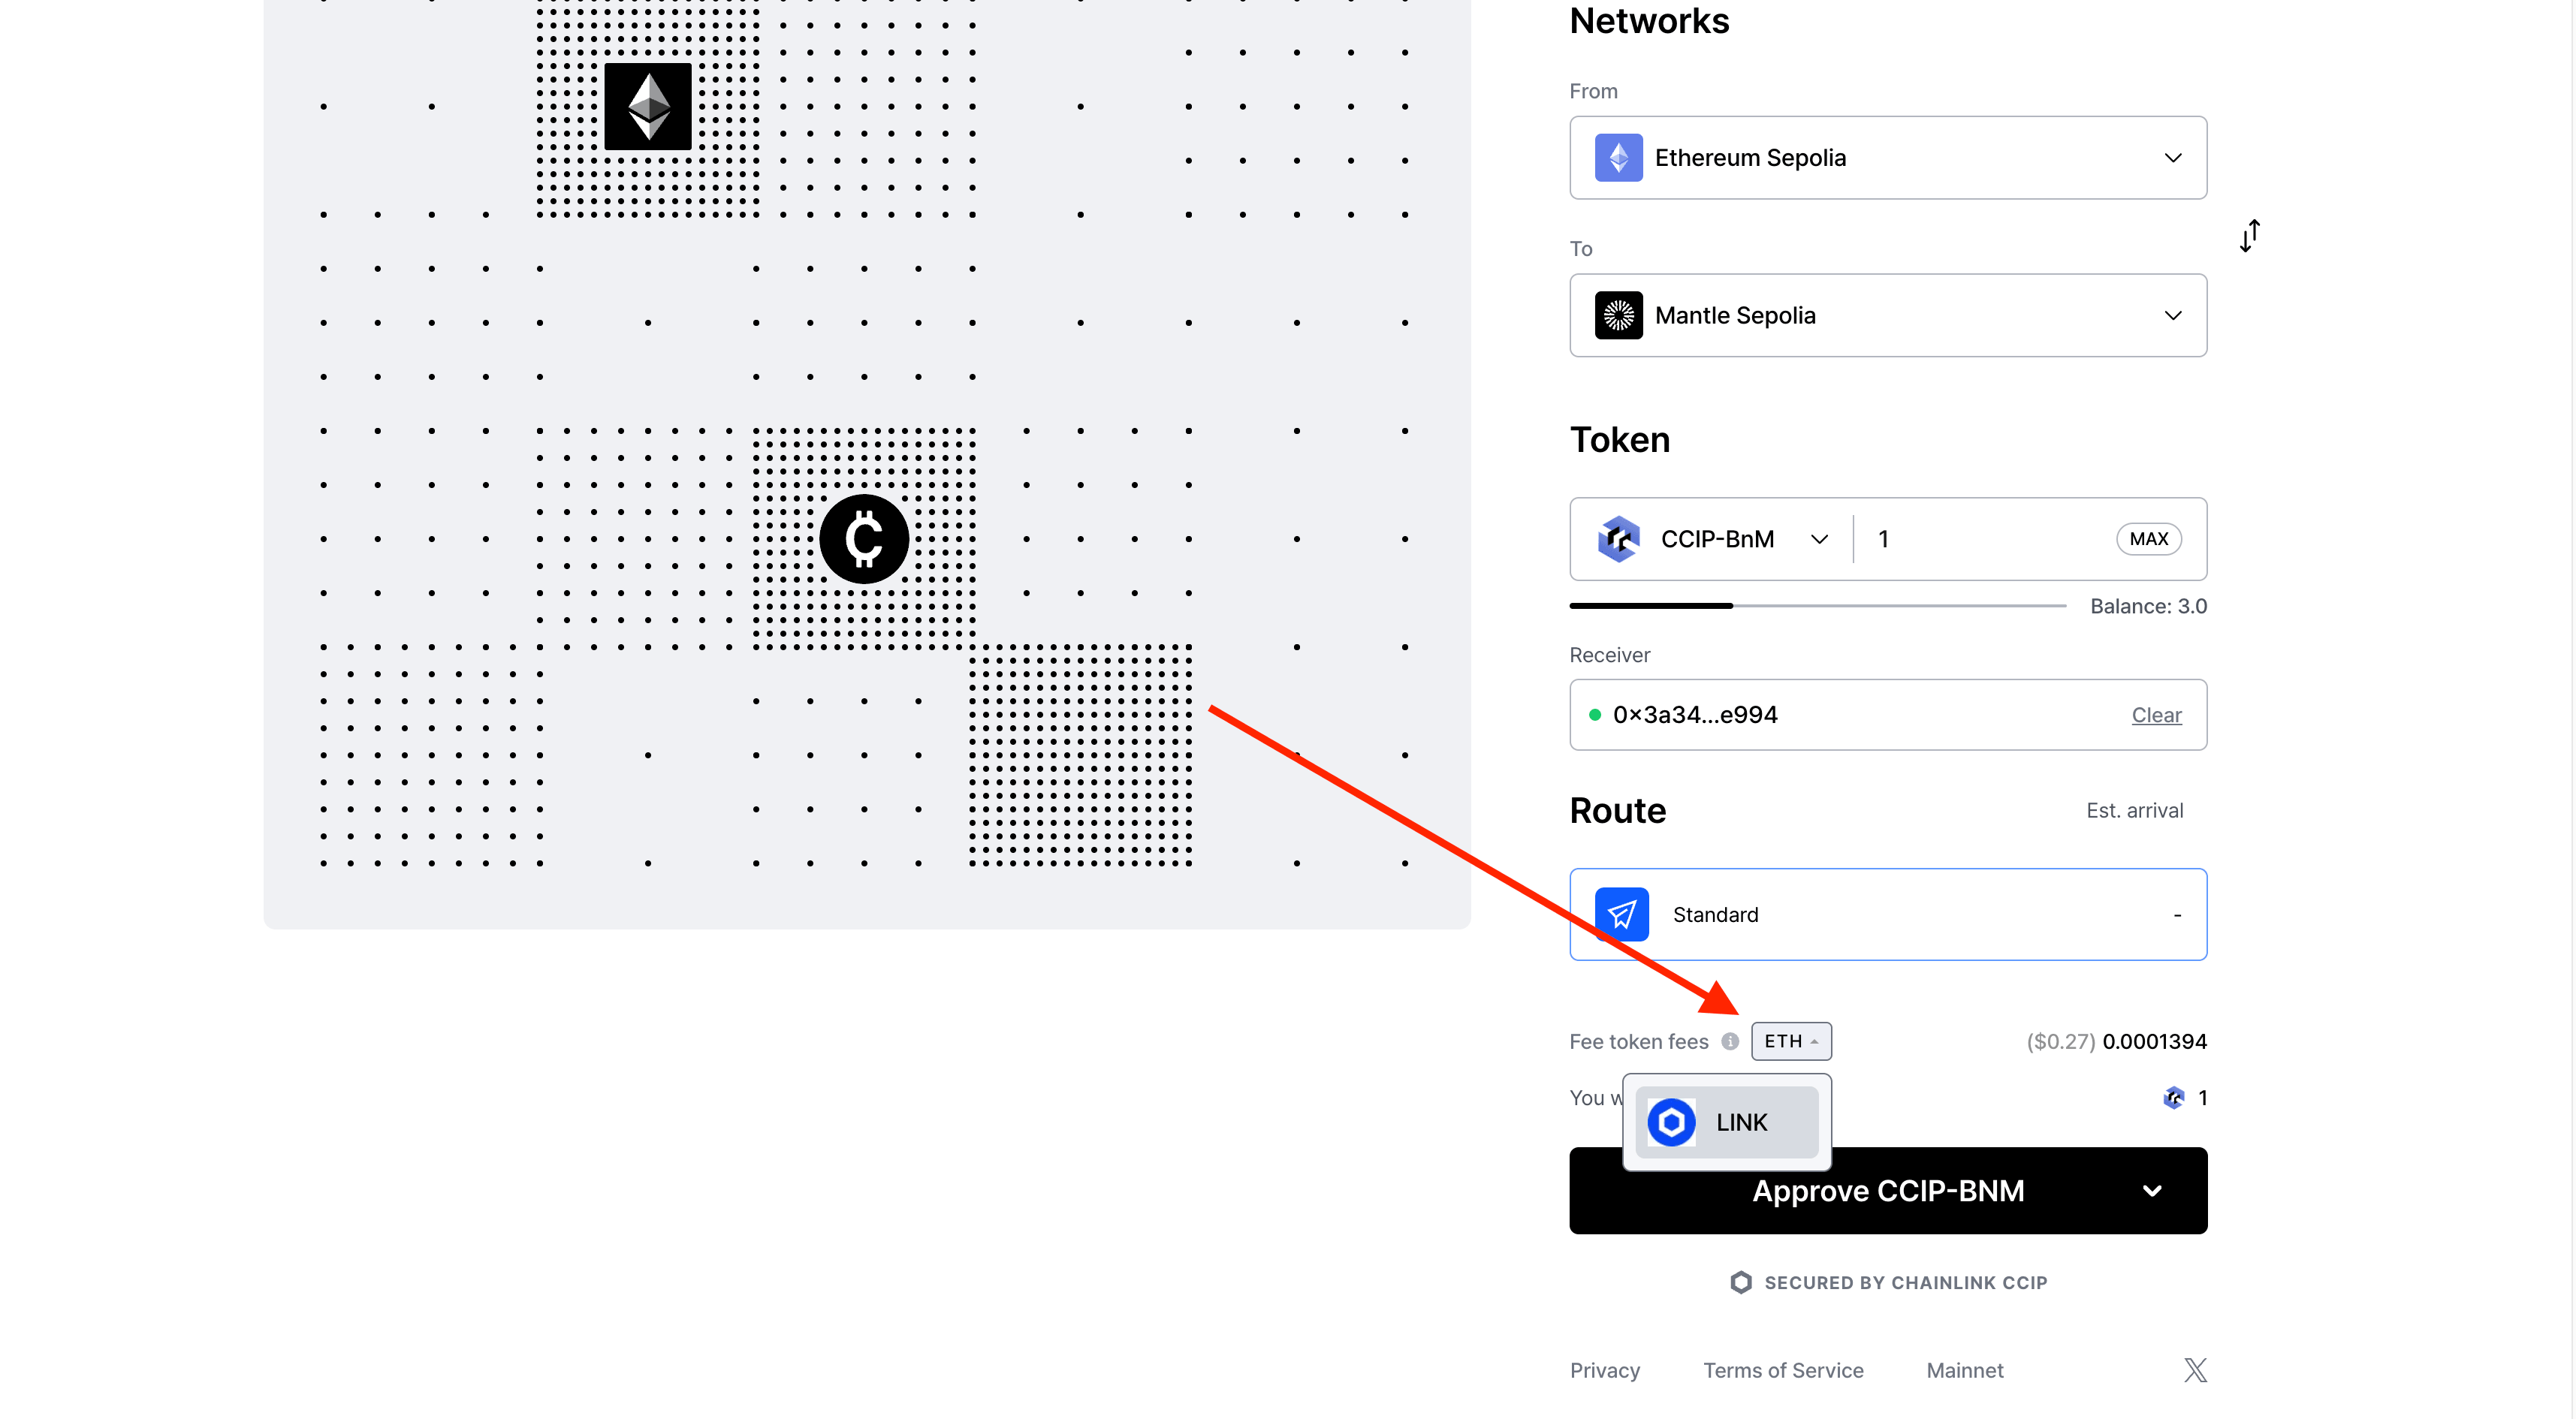
4 Initiate Transfer
- After all the settings are configured, and allowances approved, click on the
Sendbutton to initiate the transfer. - Approve the transfer in the wallet popup.
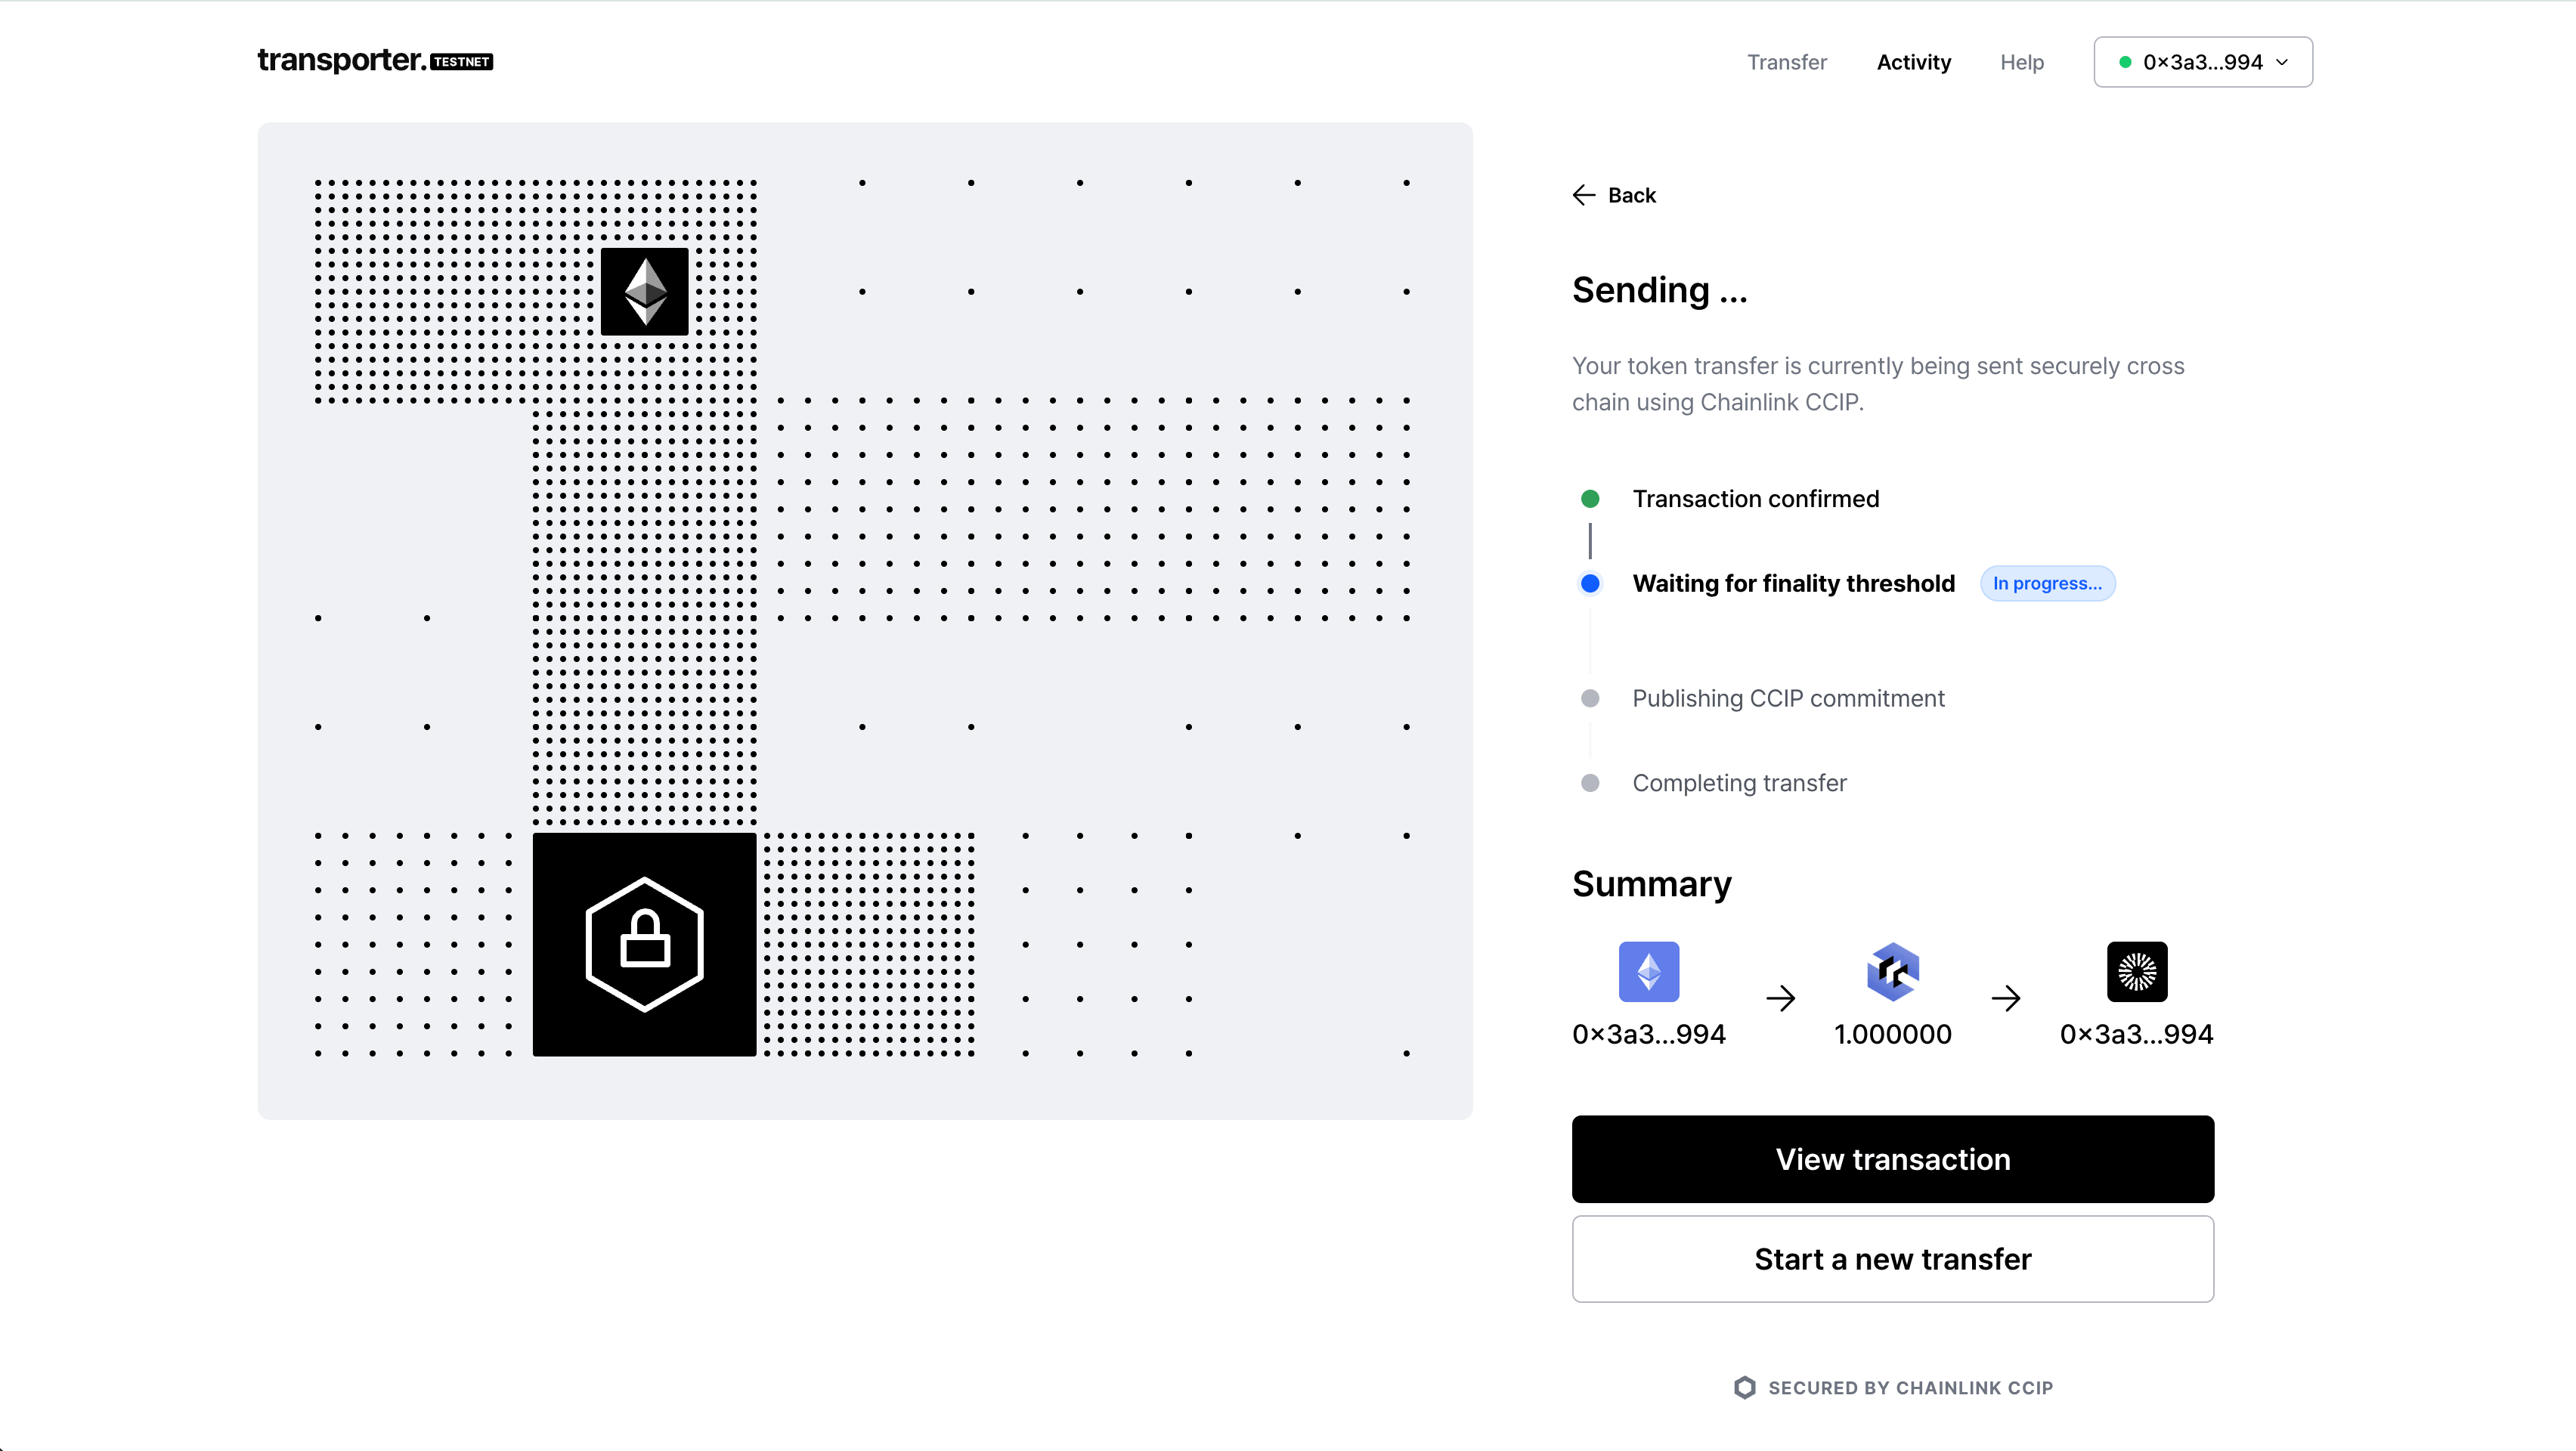
- You can check out the status of the transfer in the
Activitytab of the Transporter UI, or on the CCIP Explorer.
Send and Receive Cross-Chain Messages Using CCIP
Before you begin
You will need:
-
Basic Solidity and smart contract deployment experience
-
One wallet funded on two CCIP-supported EVM testnets: Ethereum Sepolia and Arbitrum Sepolia. You will need
ETHandLINKon Ethereum Sepolia, andETHon Arbitrum Sepolia. -
Choose one of the following development environments:
Examine the code
This section goes through the code for the Sender and Receiver contracts needed to complete the tutorial.
We will use the same contracts for all three development environments.
1 Sender code
The sender contract interacts with CCIP to send data cross-chain. Key elements are explained below.

// SPDX-License-Identifier: MIT
pragma solidity 0.8.24;

import {IRouterClient} from "@chainlink/contracts-ccip/contracts/interfaces/IRouterClient.sol";
import {Client} from "@chainlink/contracts-ccip/contracts/libraries/Client.sol";
import {ExtraArgsCodec} from "@chainlink/contracts-ccip/contracts/libraries/ExtraArgsCodec.sol";
import {OwnerIsCreator} from "@chainlink/contracts/src/v0.8/shared/access/OwnerIsCreator.sol";
import {LinkTokenInterface} from "@chainlink/contracts/src/v0.8/shared/interfaces/LinkTokenInterface.sol";

/**
 * THIS IS AN EXAMPLE CONTRACT THAT USES HARDCODED VALUES FOR CLARITY.
 * THIS IS AN EXAMPLE CONTRACT THAT USES UN-AUDITED CODE.
 * DO NOT USE THIS CODE IN PRODUCTION.
 */

/// @title - A simple contract for sending string data across chains.
contract Sender is OwnerIsCreator {
  error NotEnoughBalance(uint256 currentBalance, uint256 calculatedFees);

  event MessageSent(
    bytes32 indexed messageId,
    uint64 indexed destinationChainSelector,
    address receiver,
    string text,
    address feeToken,
    uint256 fees
  );

  IRouterClient private s_router;
  LinkTokenInterface private s_linkToken;

  /// @notice Constructor initializes the contract with the router address.
  /// @param _router The address of the router contract.
  /// @param _link The address of the LINK token contract.
  constructor(
    address _router,
    address _link
  ) {
    s_router = IRouterClient(_router);
    s_linkToken = LinkTokenInterface(_link);
  }

  /// @notice Sends data to receiver on the destination chain.
  /// @dev Assumes your contract has sufficient LINK to cover fees.
  /// @param destinationChainSelector The identifier (aka selector) for the destination blockchain.
  /// @param receiver The address of the recipient on the destination blockchain.
  /// @param text The string text to be sent.
  /// @return messageId The ID of the message that was sent.
  function sendMessage(
    uint64 destinationChainSelector,
    address receiver,
    string calldata text
  ) external onlyOwner returns (bytes32 messageId) {
    // Create an EVM2AnyMessage struct in memory with necessary information for sending a cross-chain message
    Client.EVM2AnyMessage memory evm2AnyMessage = Client.EVM2AnyMessage({
      receiver: abi.encode(receiver), // ABI-encoded receiver address
      data: abi.encode(text), // ABI-encoded string
      tokenAmounts: new Client.EVMTokenAmount[](0), // Empty array — no tokens are being sent
      extraArgs: ExtraArgsCodec._getBasicEncodedExtraArgsV3(
        200_000, // Gas limit for the callback on the destination chain
        bytes4(0) // Default finality (wait for full finalization)
      ),
      feeToken: address(s_linkToken) // Pay CCIP fees in LINK
    });

    // Get the fee required to send the message
    uint256 fees = s_router.getFee(destinationChainSelector, evm2AnyMessage);

    if (fees > s_linkToken.balanceOf(address(this))) {
      revert NotEnoughBalance(s_linkToken.balanceOf(address(this)), fees);
    }

    // Approve the Router to transfer LINK tokens on contract's behalf. It will spend the fees in LINK
    s_linkToken.approve(address(s_router), fees);

    // Send the message through the router and store the returned message ID
    messageId = s_router.ccipSend(destinationChainSelector, evm2AnyMessage);

    // Emit an event with message details
    emit MessageSent(messageId, destinationChainSelector, receiver, text, address(s_linkToken), fees);

    // Return the message ID
    return messageId;
  }
}
Initializing the contract
When deploying the contract, you define the router address and the LINK contract address of the blockchain where you deploy. The router provides:
Sending data
The sendMessage function:
-
Constructs a CCIP message using the
EVM2AnyMessagestruct:receiver: ABI-encoded destination address.data: ABI-encoded string payload.tokenAmounts: Empty array (no tokens sent).extraArgs: Encoded viaExtraArgsCodec._getBasicEncodedExtraArgsV3with agasLimitof200000and default finality (bytes4(0)).feeToken: The LINK token address, indicating fees are paid in LINK.
-
Computes the fees via the router's
getFeefunction. -
Verifies the contract's LINK balance covers the fees.
-
Approves the router to spend the required LINK.
-
Dispatches the message via the router's
ccipSendfunction.
2 Receiver code
The receiver contract interacts with CCIP to receive data on the destination chain.
// SPDX-License-Identifier: MIT
pragma solidity 0.8.24;

import {CCIPReceiver} from "@chainlink/contracts-ccip/contracts/applications/CCIPReceiver.sol";
import {Client} from "@chainlink/contracts-ccip/contracts/libraries/Client.sol";
import {FinalityCodec} from "@chainlink/contracts-ccip/contracts/libraries/FinalityCodec.sol";

/**
 * THIS IS AN EXAMPLE CONTRACT THAT USES HARDCODED VALUES FOR CLARITY.
 * THIS IS AN EXAMPLE CONTRACT THAT USES UN-AUDITED CODE.
 * DO NOT USE THIS CODE IN PRODUCTION.
 */

/// @title - A simple contract for receiving string data across chains.
contract Receiver is CCIPReceiver {
  event MessageReceived(bytes32 indexed messageId, uint64 indexed sourceChainSelector, address sender, string text);

  bytes32 private s_lastReceivedMessageId;
  string private s_lastReceivedText;

  /// @notice Constructor initializes the contract with the router address.
  /// @param router The address of the router contract.
  constructor(
    address router
  ) CCIPReceiver(router) {}

  /// @notice Handle a received message.
  function _ccipReceive(
    Client.Any2EVMMessage memory any2EvmMessage
  ) internal override {
    s_lastReceivedMessageId = any2EvmMessage.messageId;
    s_lastReceivedText = abi.decode(any2EvmMessage.data, (string));

    emit MessageReceived(
      any2EvmMessage.messageId,
      any2EvmMessage.sourceChainSelector,
      abi.decode(any2EvmMessage.sender, (address)),
      abi.decode(any2EvmMessage.data, (string))
    );
  }

  /// @notice Returns the CCVs and finality config for a given source chain.
  /// @dev Override to advertise receiver finality policy to the OffRamp.
  function getCCVsAndFinalityConfig(
    uint64,
    bytes calldata
  )
    external
    view
    override
    returns (
      address[] memory requiredCCVs,
      address[] memory optionalCCVs,
      uint8 optionalThreshold,
      bytes4 allowedFinalityConfig
    )
  {
    return (new address[](0), new address[](0), 0, FinalityCodec.WAIT_FOR_FINALITY_FLAG);
  }

  /// @notice Fetches the details of the last received message.
  /// @return messageId The ID of the last received message.
  /// @return text The last received text.
  function getLastReceivedMessageDetails() external view returns (bytes32 messageId, string memory text) {
    return (s_lastReceivedMessageId, s_lastReceivedText);
  }
}
Initializing the contract
When you deploy the contract, you define the router address. The receiver inherits from CCIPReceiver, which uses the router address.
Receiving data
On the destination blockchain:
-
The CCIP Router invokes
ccipReceivefunction. This function is protected by theonlyRoutermodifier, ensuring only the router can call it. -
ccipReceivecalls the internal_ccipReceivefunction.
_ccipReceivereceives anAny2EVMMessagestruct containing:- The CCIP
messageId. - The
sourceChainSelector. - The
senderaddress in bytes format, decoded via abi.decode. - The
datain bytes format, decoded to astring.
- The CCIP
Send a cross-chain message using CCIP
Send and verify a cross-chain message using CCIP in under 10 minutes, with your favorite development framework.
Hardhat 3
Best for a TypeScript-based scripting workflow where you deploy contracts, send a CCIP message, and verify delivery from the command line.
1 Bootstrap a new Hardhat project
- Open a new terminal in a directory of your choice and run this command:

npx hardhat --init
Create a project with the following options:
- Hardhat Version: hardhat-3
- Initialize project: At root of the project
- Type of project: A minimal Hardhat project
- Install the necessary dependencies: Yes
- Install the additional dependencies required by this tutorial:
npm install @chainlink/contracts-ccip @chainlink/contracts viem
npm install --save-dev @nomicfoundation/hardhat-viem @nomicfoundation/hardhat-keystore
- Update
hardhat.config.tsto use thehardhat-viemandhardhat-keystoreplugins:

import { configVariable, defineConfig } from "hardhat/config"
import hardhatKeystore from "@nomicfoundation/hardhat-keystore"
import hardhatViem from "@nomicfoundation/hardhat-viem"

export default defineConfig({
  plugins: [hardhatViem, hardhatKeystore],
  solidity: {
    version: "0.8.24",
  },
  networks: {
    sepolia: {
      type: "http",
      url: configVariable("SEPOLIA_RPC_URL"),
      accounts: [configVariable("PRIVATE_KEY")],
    },
    arbitrumSepolia: {
      type: "http",
      url: configVariable("ARBITRUM_SEPOLIA_RPC_URL"),
      accounts: [configVariable("PRIVATE_KEY")],
    },
  },
})
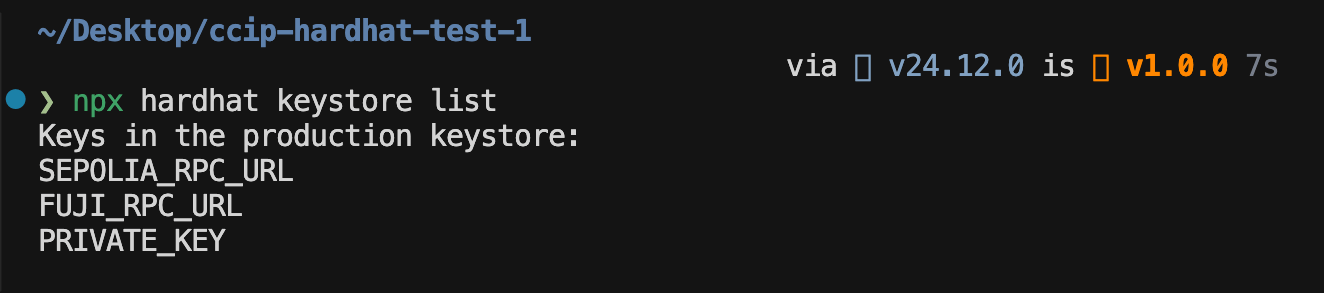
- Set the environment variables using
hardhat-keystore. Run the following commands in succession — Hardhat will ask you to enter a password for the keystore for each variable:
npx hardhat keystore set SEPOLIA_RPC_URL
npx hardhat keystore set ARBITRUM_SEPOLIA_RPC_URL
npx hardhat keystore set PRIVATE_KEY
The output of npx hardhat keystore list should look like this:
2 Set up the contracts
- Create a new directory named
contractsfor your smart contracts if it doesn't already exist. - Create a new file named
Sender.solin this directory and paste the sender contract code inside it. - Create a new file named
Receiver.solin the same directory and paste the receiver contract code inside it. - Run the following command to compile the contracts:
npx hardhat build
3 Send a cross-chain message
- Create a new directory named
scriptsat the root of the project if it doesn't already exist. - Create a new file named
send-cross-chain-message.tsin this directory and paste the following code inside it:
import { network } from "hardhat"
import { getContract, parseAbi, parseUnits } from "viem"

// Ethereum Sepolia configuration
const SEPOLIA_ROUTER = "0x0BF3dE8c5D3e8A2B34D2BEeB17ABfCeBaf363A59"
const SEPOLIA_LINK = "0x779877A7B0D9E8603169DdbD7836e478b4624789"

// Arbitrum Sepolia configuration
const ARBITRUM_SEPOLIA_ROUTER = "0x2a9C5afB0d0e4BAb2BCdaE109EC4b0c4Be15a165"
const ARBITRUM_SEPOLIA_CHAIN_SELECTOR = 3478487238524512106n

// Connect to Ethereum Sepolia
console.log("Connecting to Ethereum Sepolia...")
const sepoliaNetwork = await network.connect("sepolia")

// Connect to Arbitrum Sepolia
console.log("Connecting to Arbitrum Sepolia...")
const arbitrumSepoliaNetwork = await network.connect("arbitrumSepolia")

// Step 1: Deploy Sender on Sepolia
console.log("\n[Step 1] Deploying Sender contract on Ethereum Sepolia...")

const sender = await sepoliaNetwork.viem.deployContract("Sender", [SEPOLIA_ROUTER, SEPOLIA_LINK])
const sepoliaPublicClient = await sepoliaNetwork.viem.getPublicClient()

console.log(`Sender deployed on Sepolia: ${sender.address}`)
console.log(`View on Etherscan: https://sepolia.etherscan.io/address/${sender.address}`)

// Step 2: Fund Sender with LINK
console.log("\n[Step 2] Funding Sender with 1 LINK...")

const [sepoliaWalletClient] = await sepoliaNetwork.viem.getWalletClients()
if (!sepoliaWalletClient) {
  throw new Error("No wallet client available. Check PRIVATE_KEY + network config in hardhat.config.ts.")
}

const linkTokenInterfaceAbi = parseAbi(["function transfer(address to, uint256 value) returns (bool)"])

const link = getContract({
  address: SEPOLIA_LINK,
  abi: linkTokenInterfaceAbi,
  client: { public: sepoliaPublicClient, wallet: sepoliaWalletClient },
})

const transferLinkTx = await link.write.transfer([sender.address, parseUnits("1", 18)])

console.log("LINK token transfer in progress, awaiting confirmation...")
await sepoliaPublicClient.waitForTransactionReceipt({ hash: transferLinkTx, confirmations: 1 })
console.log("Funded Sender with 1 LINK")

// Step 3: Deploy Receiver on Arbitrum Sepolia
console.log("\n[Step 3] Deploying Receiver on Arbitrum Sepolia...")

const receiver = await arbitrumSepoliaNetwork.viem.deployContract("Receiver", [ARBITRUM_SEPOLIA_ROUTER])
const arbitrumSepoliaPublicClient = await arbitrumSepoliaNetwork.viem.getPublicClient()

console.log(`Receiver deployed on Arbitrum Sepolia: ${receiver.address}`)
console.log(`View on Arbiscan: https://sepolia.arbiscan.io/address/${receiver.address}`)
console.log(`\n📋 Copy the receiver address since it will be needed to run the verification script 📋\n`)

// Step 4: Send cross-chain message
console.log("\n[Step 4] Sending cross-chain message...")

const sendMessageTx = await sender.write.sendMessage([
  ARBITRUM_SEPOLIA_CHAIN_SELECTOR,
  receiver.address,
  "Hello World from Hardhat script!",
])

console.log("Cross-chain message sent, awaiting confirmation...")
console.log(`Message sent! ✅\nTx hash: ${sendMessageTx}`)
console.log(`View transaction status on CCIP Explorer: https://ccip.chain.link`)
console.log("Run the verification script after a few minutes to check if the message has been received.")
- Run the following command to send the cross-chain message:
npx hardhat run scripts/send-cross-chain-message.ts
4 Verify message delivery
-
Wait for a few minutes for the message to be delivered to the receiver contract.
-
Create a new file named
verify-cross-chain-message.tsin thescriptsdirectory and paste the following code inside it:
import { network } from "hardhat"

// Paste the Receiver contract address
const RECEIVER_ADDRESS = ""

console.log("Connecting to Arbitrum Sepolia...")
const arbitrumSepoliaNetwork = await network.connect("arbitrumSepolia")

console.log("Checking for received message...\n")
const receiver = await arbitrumSepoliaNetwork.viem.getContractAt("Receiver", RECEIVER_ADDRESS)

const [messageId, text] = await receiver.read.getLastReceivedMessageDetails()

const ZERO_BYTES32 = "0x0000000000000000000000000000000000000000000000000000000000000000"

if (messageId === ZERO_BYTES32) {
  console.log("No message received yet.")
  console.log("Please wait a bit longer and try again.")
  process.exit(1)
} else {
  console.log(`✅ Message ID: ${messageId}`)
  console.log(`Text: "${text}"`)
}
- Run the following command to verify the cross-chain message:
npx hardhat run scripts/verify-cross-chain-message.ts
- You should see the message ID and text of the last received message printed in the terminal.
Foundry
Best for Solidity-native workflows that prefer a modular, powerful scripting framework.
1 Bootstrap a new Foundry project
- Open a new terminal in a directory of your choice and run this command to initialize a new Foundry project:
forge init
- Install the required dependencies:
forge install smartcontractkit/chainlink-ccip smartcontractkit/chainlink-evm
- Use Foundry's
castcommand to create a new keystore for yourPRIVATE_KEY:
cast wallet import --interactive PRIVATE_KEY
And use the cast wallet list command to verify:

- Configure the remappings so that your
foundry.tomlfile looks like this:

[profile.default]
solc = "0.8.24"
src = "src"
out = "out"
libs = ["lib"]

remappings = [
  "forge-std/=lib/forge-std/src/",
  "@chainlink/contracts-ccip/contracts/=lib/chainlink-ccip/chains/evm/contracts/",
  "@chainlink/contracts/=lib/chainlink-evm/contracts/",
  "@openzeppelin/contracts@5.3.0/utils/introspection/=lib/forge-std/src/interfaces/"
]

[rpc_endpoints]
sepolia = "ENTER_YOUR_SEPOLIA_RPC_URL_HERE"
arbitrumSepolia = "ENTER_YOUR_ARBITRUM_SEPOLIA_RPC_URL_HERE"
2 Set up the contracts
- Create a new directory named
srcat the root of the project if it doesn't already exist. - Create a new file named
Sender.solin this directory and paste the sender contract code inside it. - Create a new file named
Receiver.solin the same directory and paste the receiver contract code inside it. - Run the following command to compile the contracts:
forge build
3 Send a cross-chain message
- Create a new directory named
scriptat the root of the project if it doesn't already exist. - Create a new file named
SendCrossChainMessage.s.solin this directory and paste the following code inside it:
// SPDX-License-Identifier: UNLICENSED
pragma solidity 0.8.24;

import {Script, console} from "forge-std/Script.sol";
import {Sender} from "../src/Sender.sol";
import {Receiver} from "../src/Receiver.sol";
import {LinkTokenInterface} from "@chainlink/contracts/src/v0.8/shared/interfaces/LinkTokenInterface.sol";

contract SendCrossChainMessage is Script {
    // Ethereum Sepolia configuration
    address constant SEPOLIA_ROUTER = 0x0BF3dE8c5D3e8A2B34D2BEeB17ABfCeBaf363A59;
    address constant SEPOLIA_LINK = 0x779877A7B0D9E8603169DdbD7836e478b4624789;

    // Arbitrum Sepolia configuration
    address constant ARBITRUM_SEPOLIA_ROUTER = 0x2a9C5afB0d0e4BAb2BCdaE109EC4b0c4Be15a165;
    uint64 constant ARBITRUM_SEPOLIA_CHAIN_SELECTOR = 3478487238524512106;

    uint256 ONE_LINK = 1e18;

    function run() public {

        // Load RPC configs from foundry.toml
        uint256 sepoliaFork = vm.createFork(vm.rpcUrl("sepolia"));
        uint256 arbitrumSepoliaFork = vm.createFork(vm.rpcUrl("arbitrumSepolia"));

        // Step 1: Deploy Sender on Sepolia
        console.log("Connecting to Ethereum Sepolia...");
        vm.selectFork(sepoliaFork);
        vm.startBroadcast();

        console.log("\n[Step 1] Deploying Sender contract on Ethereum Sepolia...");
        Sender sender = new Sender(SEPOLIA_ROUTER, SEPOLIA_LINK);
        console.log("Sender deployed on Sepolia:", address(sender));
        console.log(
            string.concat(
                "View on Etherscan: https://sepolia.etherscan.io/address/",
                vm.toString(address(sender))
            )
        );

        // Step 2: Fund Sender with 1 LINK
        console.log("\n[Step 2] Funding Sender with 1 LINK...");
        LinkTokenInterface(SEPOLIA_LINK).transfer(address(sender), ONE_LINK);
        vm.stopBroadcast();
        console.log("Funded Sender with 1 LINK");

        // Step 3: Deploy Receiver on Arbitrum Sepolia
        console.log("\nConnecting to Arbitrum Sepolia...");
        vm.selectFork(arbitrumSepoliaFork);
        vm.startBroadcast();

        console.log("\n[Step 3] Deploying Receiver on Arbitrum Sepolia...");
        Receiver receiver = new Receiver(ARBITRUM_SEPOLIA_ROUTER);
        vm.stopBroadcast();
        console.log("Receiver deployed on Arbitrum Sepolia:", address(receiver));
        console.log(
            string.concat(
                "View on Arbiscan: https://sepolia.arbiscan.io/address/",
                vm.toString(address(receiver))
            )
        );
        console.log("\n .....Copy the receiver address for the verification script.....\n");
        console.log(address(receiver));

        // Step 4: Send cross-chain message (Sepolia -> Arbitrum Sepolia)
        vm.selectFork(sepoliaFork);
        vm.startBroadcast();

        console.log("\n[Step 4] Sending cross-chain message from Sepolia to Arbitrum Sepolia...");
        bytes32 messageId = sender.sendMessage(
            ARBITRUM_SEPOLIA_CHAIN_SELECTOR,
            address(receiver),
            "Hello World from Foundry script!"
        );
        vm.stopBroadcast();

        console.log("Message sent! Check for delivery after a few minutes...");
        console.log("CCIP messageId:");
        console.logBytes32(messageId);
        console.log("View transaction status on CCIP Explorer: https://ccip.chain.link");
    }
}
- Run the following command to send the cross-chain message:
forge script script/SendCrossChainMessage.s.sol:SendCrossChainMessage --broadcast --multi --account PRIVATE_KEY
4 Verify message delivery
- Create a new file named
VerifyCrossChainMessage.s.solin thescriptdirectory and paste the following code inside it:
// SPDX-License-Identifier: UNLICENSED
pragma solidity 0.8.24;

import {Script, console} from "forge-std/Script.sol";
import {Receiver} from "../src/Receiver.sol";

contract VerifyCrossChainMessage is Script {

    bytes32 constant ZERO_BYTES32 = bytes32(0);

    function run() public {

        address receiverAddress = PASTE_RECEIVER_ADDRESS_HERE;
        require(receiverAddress != address(0), "Set RECEIVER_ADDRESS");

        console.log("Connecting to Arbitrum Sepolia...");
        uint256 arbitrumSepoliaFork = vm.createFork(vm.rpcUrl("arbitrumSepolia"));
        vm.selectFork(arbitrumSepoliaFork);

        console.log("Checking for received message...\n");
        Receiver receiver = Receiver(receiverAddress);

        (bytes32 messageId, string memory text) = receiver
            .getLastReceivedMessageDetails();

        if (messageId == ZERO_BYTES32) {
            console.log("No message received yet.");
            console.log("Please wait a bit longer and try again.");
            revert("No message received yet");
        }

        console.log("Received Message ID:");
        console.logBytes32(messageId);
        console.log(string.concat('Received Text: "', text, '"'));
    }
}
- Run the following command to verify the cross-chain message:
forge script script/VerifyCrossChainMessage.s.sol:VerifyCrossChainMessage
Remix
Best for Web3-native workflows that prefer a browser-based IDE.
1 Deploy the sender contract
Deploy the Sender.sol contract on Ethereum Sepolia. To see a detailed explanation of this contract, read the Sender code section.
-
Open the Sender.sol contract in Remix.
-
Compile the contract.
-
Deploy the sender contract on Ethereum Sepolia:
-
Open MetaMask and select the Ethereum Sepolia network.
-
In Remix under the Deploy & Run Transactions tab, select Injected Provider - MetaMask in the Environment list. Remix will use the MetaMask wallet to communicate with Ethereum Sepolia.
-
Under the Deploy section, fill in the router address and the LINK token contract addresses. You can find both on the CCIP Directory. For Ethereum Sepolia, the router address is
0x0BF3dE8c5D3e8A2B34D2BEeB17ABfCeBaf363A59and the LINK address is0x779877A7B0D9E8603169DdbD7836e478b4624789.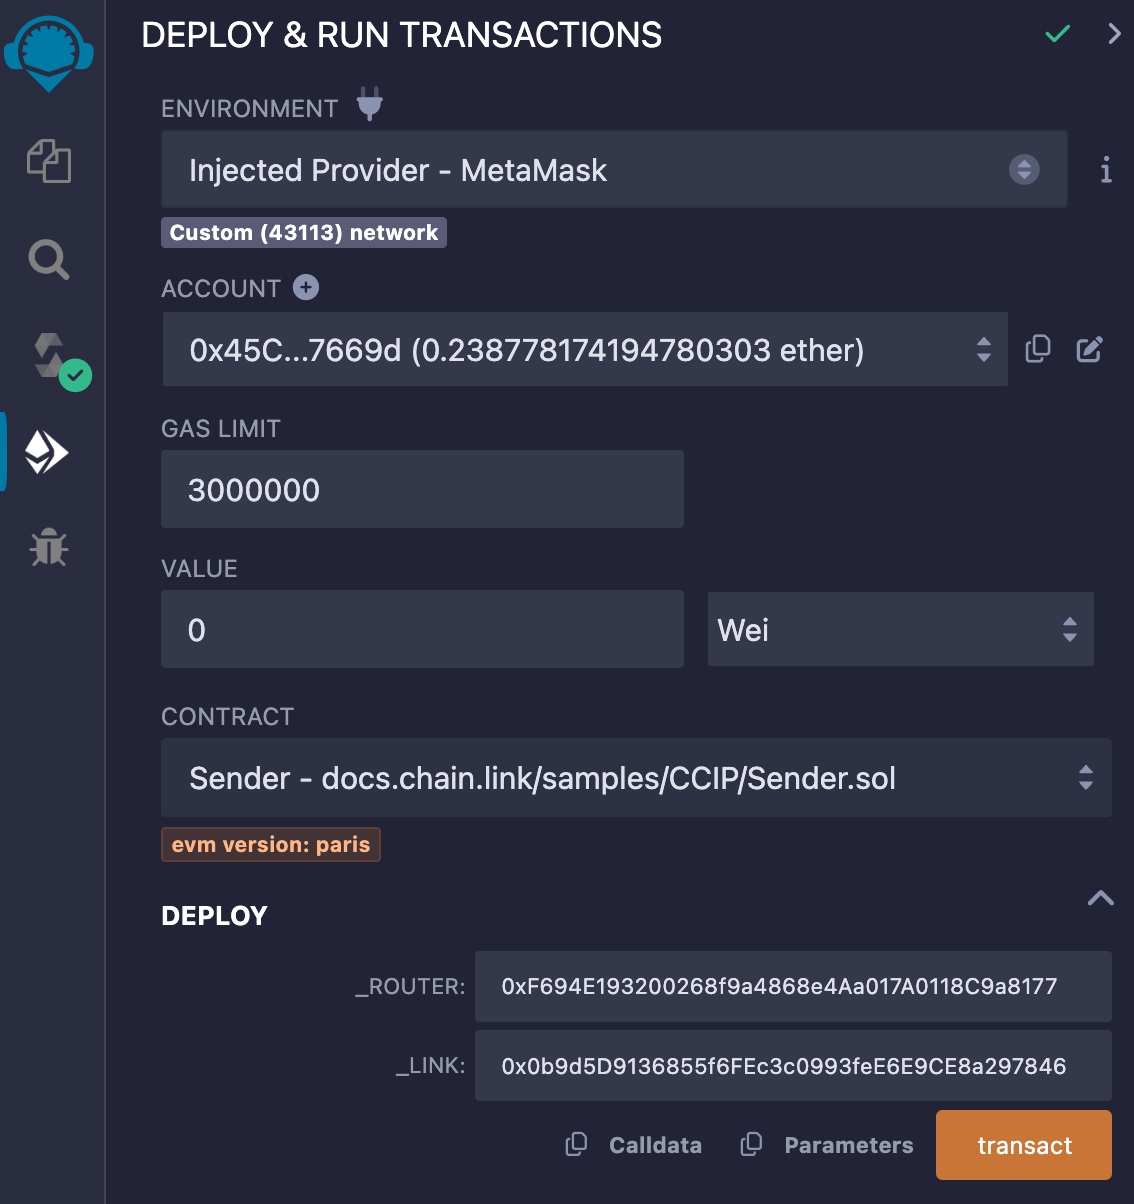
-
Click the transact button to deploy the contract. MetaMask prompts you to confirm the transaction. Check the transaction details to make sure you are deploying the contract to Ethereum Sepolia.
-
After you confirm the transaction, the contract address appears in the Deployed Contracts list. Copy your contract address.
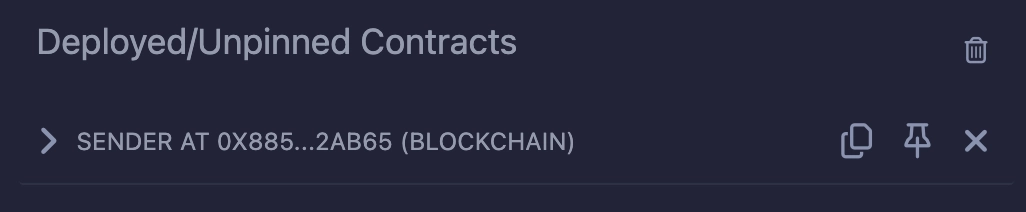
-
Open MetaMask and send
1LINK to the contract address that you copied. Your contract will pay CCIP fees in LINK.
-
2 Deploy the receiver contract
Deploy the receiver contract on Arbitrum Sepolia. You will use this contract to receive data from the sender on Ethereum Sepolia. To see a detailed explanation of this contract, read the Receiver code section.
-
Open the Receiver.sol contract in Remix.
-
Compile the contract.
-
Deploy the receiver contract on Arbitrum Sepolia:
-
Open MetaMask and select the Arbitrum Sepolia network.
-
In Remix under the Deploy & Run Transactions tab, make sure the Environment is still set to Injected Provider - MetaMask.
-
Under the Deploy section, fill in the router address field. For Arbitrum Sepolia, the Router address is
0x2a9C5afB0d0e4BAb2BCdaE109EC4b0c4Be15a165. You can find the addresses for each network on the CCIP Directory.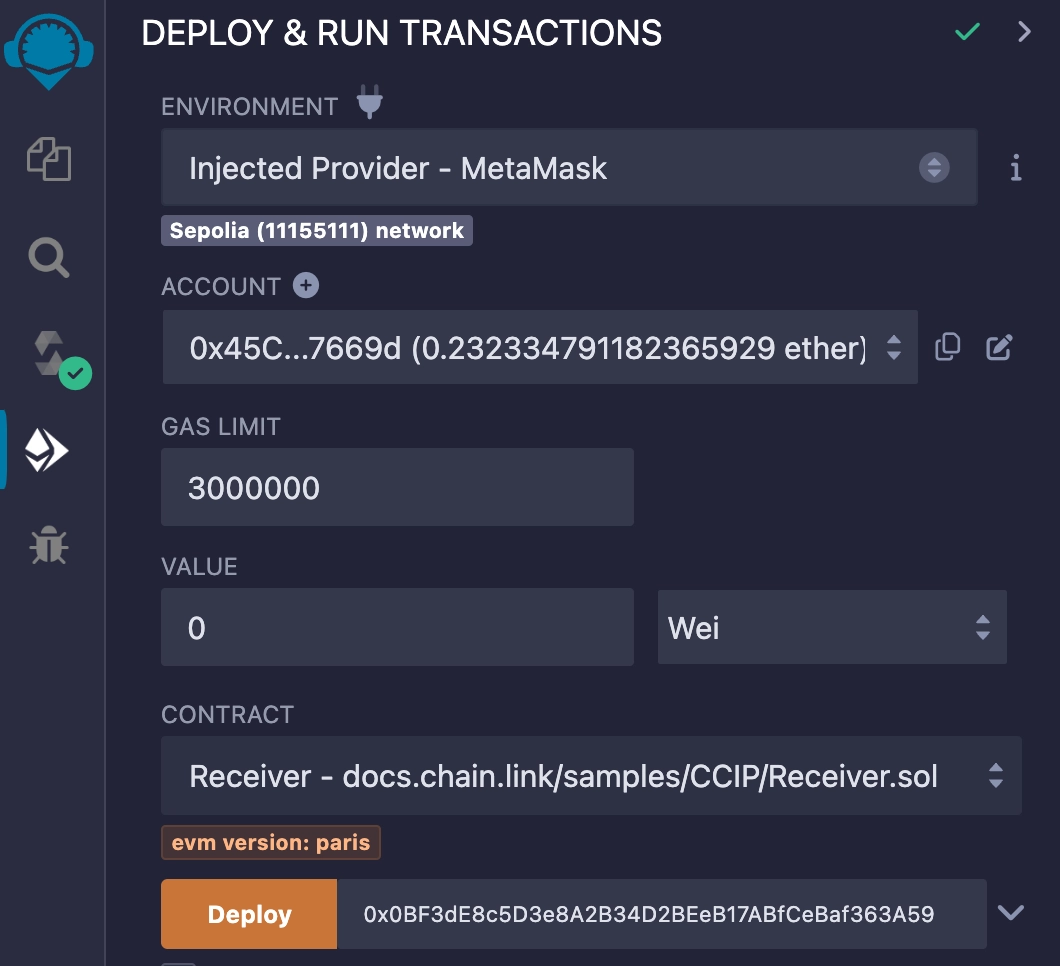
-
Click the Deploy button to deploy the contract. MetaMask prompts you to confirm the transaction. Check the transaction details to make sure you are deploying the contract to Arbitrum Sepolia.
-
After you confirm the transaction, the contract address appears as the second item in the Deployed Contracts list. Copy this contract address.
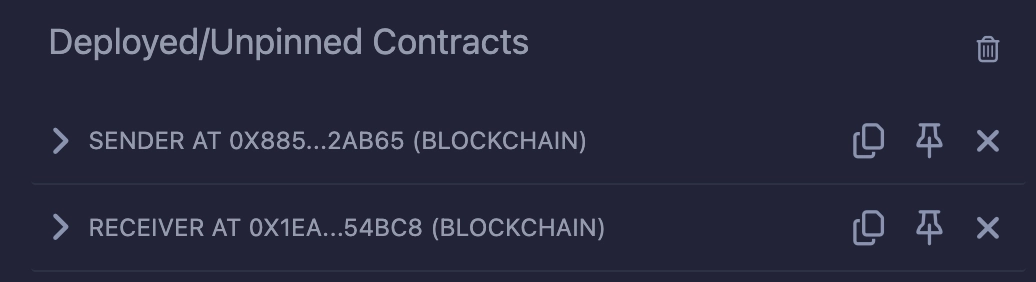
-
You now have one sender contract on Ethereum Sepolia and one receiver contract on Arbitrum Sepolia. You sent 1 LINK to the sender contract to pay the CCIP fees. Next, send data from the sender contract to the receiver contract.
3 Send data
Send a Hello World! string from your contract on Ethereum Sepolia to the contract you deployed on Arbitrum Sepolia:
-
Open MetaMask and select the Ethereum Sepolia network.
-
In Remix under the Deploy & Run Transactions tab, expand the first contract in the Deployed Contracts section.
-
Expand the sendMessage function and fill in the following arguments:
Argument Description Value (Arbitrum Sepolia) destinationChainSelector CCIP Chain identifier of the target blockchain. You can find each network's chain selector on the CCIP Directory 3478487238524512106receiver The destination smart contract address Your deployed contract address text Any stringHello World!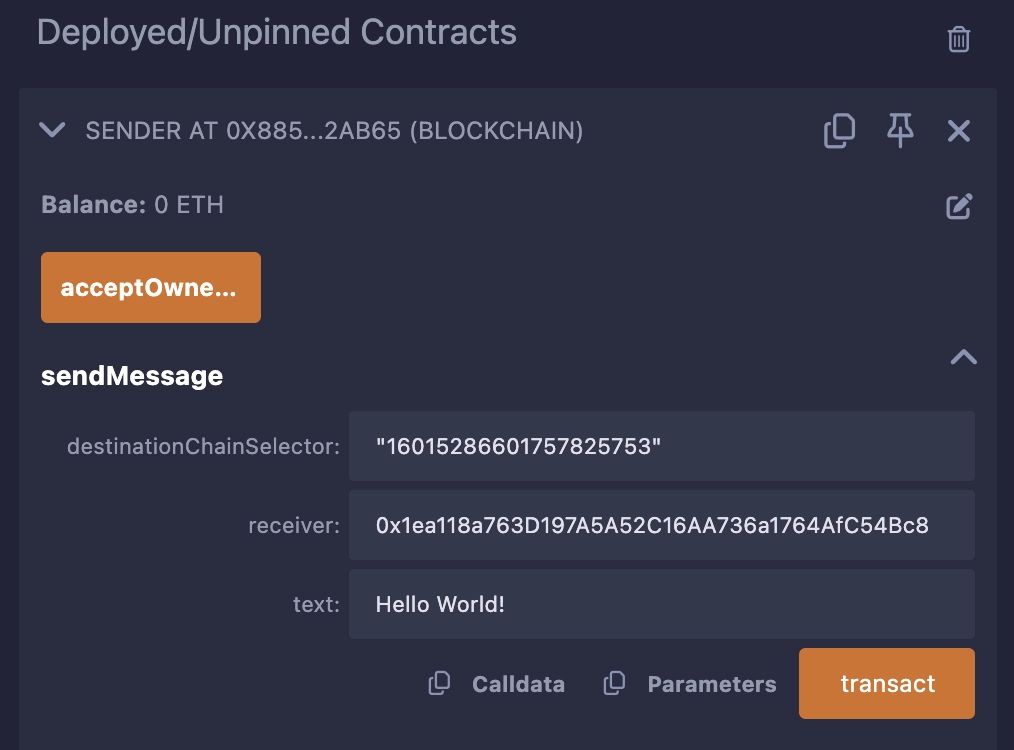
-
Click the transact button to run the function. MetaMask prompts you to confirm the transaction.
-
After the transaction is successful, note the transaction hash. Here is an example of a successful transaction on Ethereum Sepolia.
After the transaction is finalized on the source chain, it will take a few minutes for CCIP to deliver the data to Arbitrum Sepolia and call the ccipReceive function on your receiver contract. You can use the CCIP explorer to see the status of your CCIP transaction and then read data stored by your receiver contract.
-
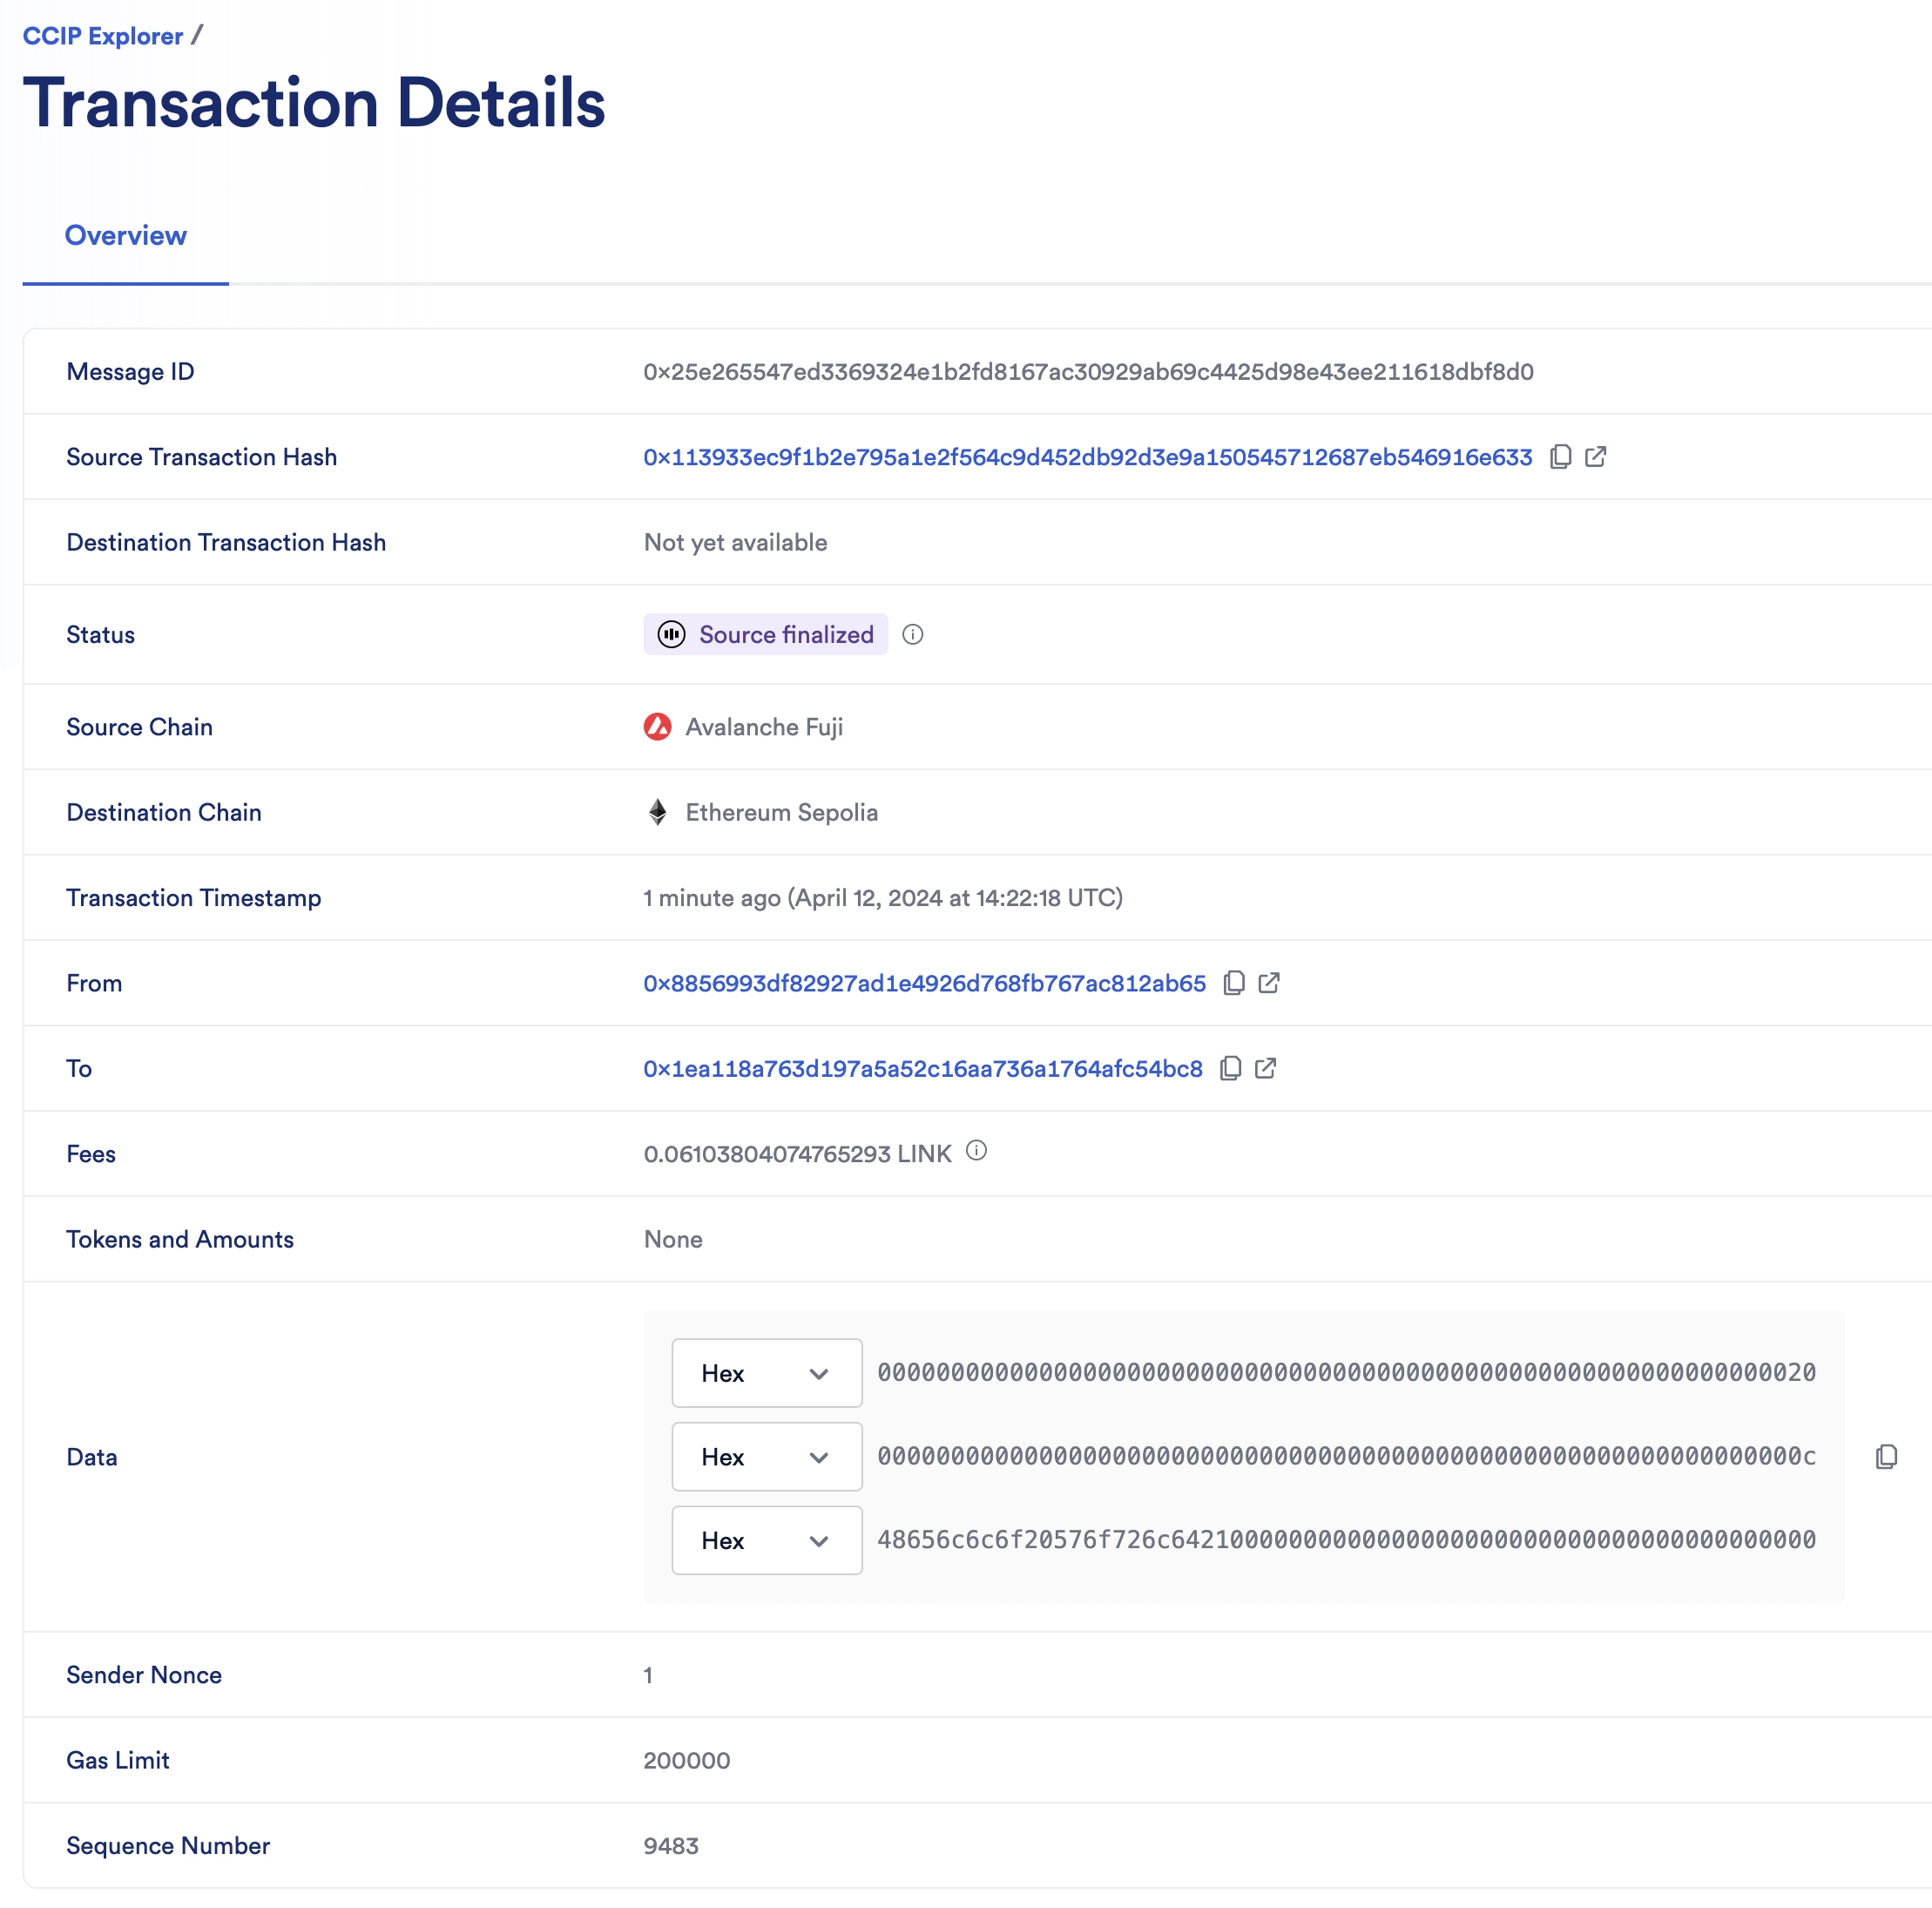
Open the CCIP explorer and use the transaction hash that you copied to search for your cross-chain transaction. The explorer provides several details about your request.
-
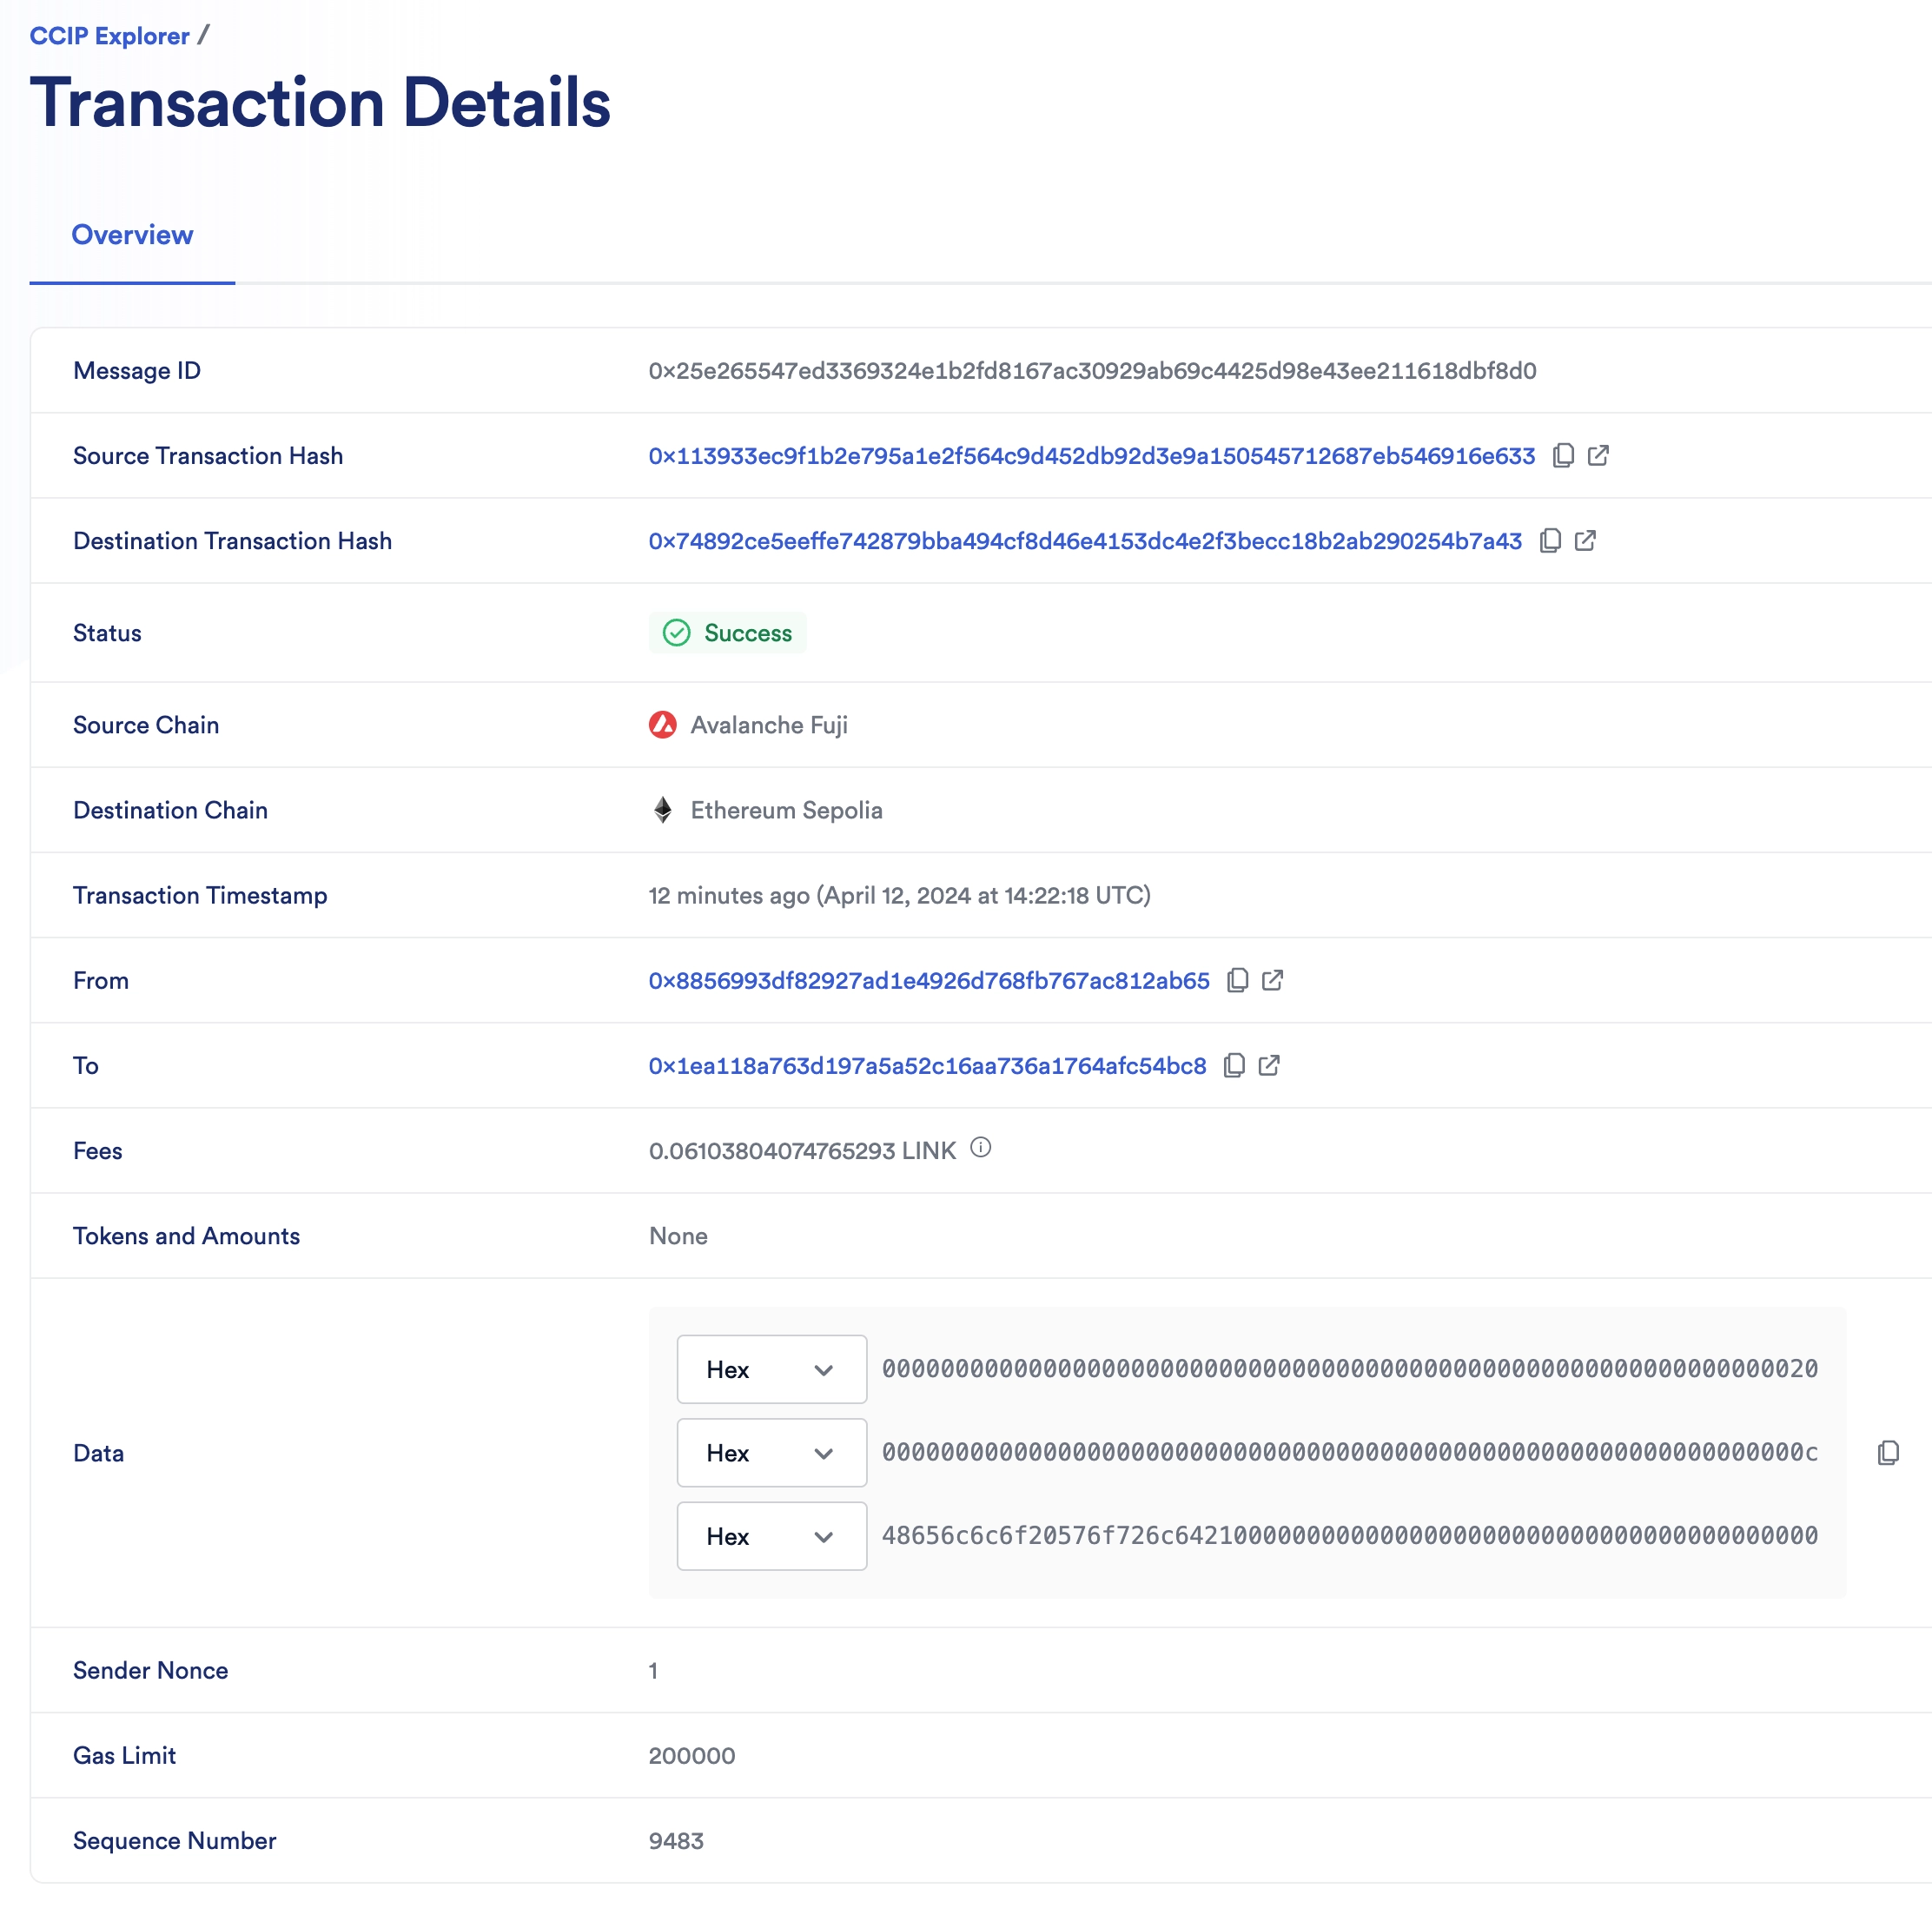
When the status of the transaction is marked with a "Success" status, the CCIP transaction and the destination transaction are complete.
4 Read data
Read data stored by the receiver contract on Arbitrum Sepolia:
-
Open MetaMask and select the Arbitrum Sepolia network.
-
In Remix under the Deploy & Run Transactions tab, expand the receiver contract deployed on Arbitrum Sepolia.
-
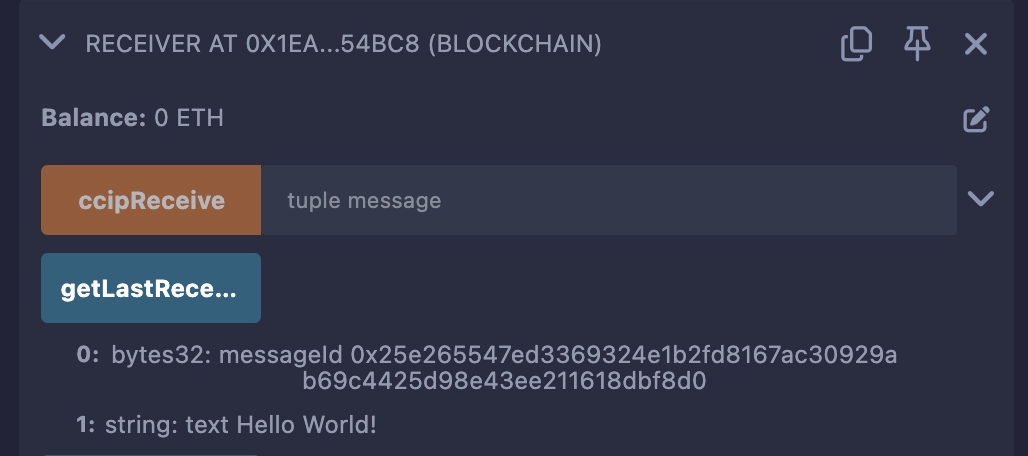
Click the getLastReceivedMessageDetails function button to read the stored data. In this example, it should be "Hello World!".
Congratulations! You just sent your first cross-chain data using CCIP 2.0. Next, examine the example code to learn how this contract works.
Once you understand basic transfers, most applications move to programmable token transfers (PTT) to combine value and execution.